 Kia Rio: Using a child restraint system
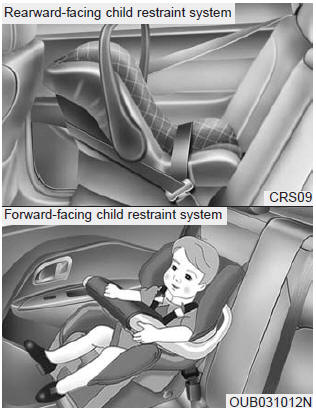
For small children and babies, the use of a child seat or infant seat is required. This child seat or infant seat should be of appropriate size for the child and should be installed in accordance with the manufacturer's instructions.
For safety reasons, we recommend that the child restraint system be used in the rear seats.
Since all passenger seat belts move freely under normal conditions and only lock under extreme or emergency conditions (emergency lock mode), you must manually change these seat belts to the auto lock mode to secure a child restraint.
If the seat belt does not operate as described in this section, have the system checked immediately by your authorized Kia dealer.
WARNING - Child seat installation
- Always follow the instructions provided by the child restraint system manufacturer. Child restraint system manufacturers know their products best.
- Failure to observe this manual's instructions regarding child restraint system and the instructions provided with the child restraint system could result in the improper installation of the child restraint system which may reduce the protection to your child in a crash or a sudden stop.
Placing a passenger seat belt into the auto lock mode
The auto lock mode will help prevent the normal movement of the child in the vehicle from causing the seat belt to loosen and compromise the child restraint system. To secure a child restraint system, use the following procedure.
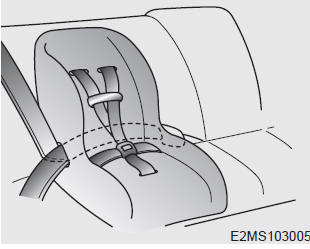
To install a child restraint system on the outboard or center rear seats, do the following:
1.Place the child restraint system in the seat and route the lap/shoulder belt around or through the restraint, following the restraint manufacturerŌĆÖs instructions. Be sure the seat belt webbing is not twisted.
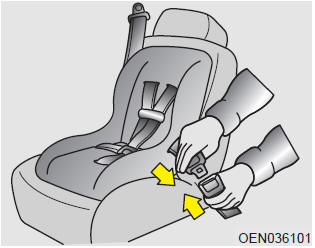
2.Fasten the lap/shoulder belt latch into the buckle. Listen for the distinct ŌĆ£clickŌĆØ sound.
Position the release button so that it is easy to access in case of an emergency.
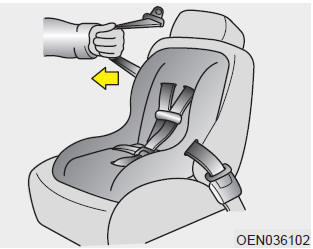
3.Pull the shoulder portion of the seat belt all the way out. When the shoulder portion of the seat belt is fully extended, it will shift the retractor to the ŌĆ£Auto LockŌĆØ (child restraint) mode.
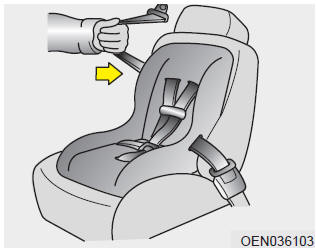
4.Slowly allow the shoulder portion of the seat belt to retract and listen for an audible ŌĆ£clickingŌĆØ or ŌĆ£ratchetingŌĆØ sound. This indicates that the retractor is in the ŌĆ£Auto LockŌĆØ mode. If no distinct sound is heard, repeat steps 3 and 4.

5.Remove as much slack from the belt as possible by pushing down on the child restraint system while feeding the shoulder belt back into the retractor.
6.Push and pull on the child restraint system to confirm that the seat belt is holding it firmly in place. If it is not, release the seat belt and repeat steps 2 through 6.
7.Double check that the retractor is in the ŌĆ£Auto LockŌĆØ mode by attempting to pull more of the seat belt out of the retractor. If you cannot, the retractor is in the ŌĆ£Auto LockŌĆØ mode.
The lap/shoulder belt automatically returns to the ŌĆ£emergency lock modeŌĆØ whenever the belt is allowed to retract fully.
Therefore, the preceding seven steps must be followed each time a child restraint is installed.
To remove the child restraint, press the release button on the buckle and then pull the lap/shoulder belt out of the restraint and allow the seat belt to retract fully.
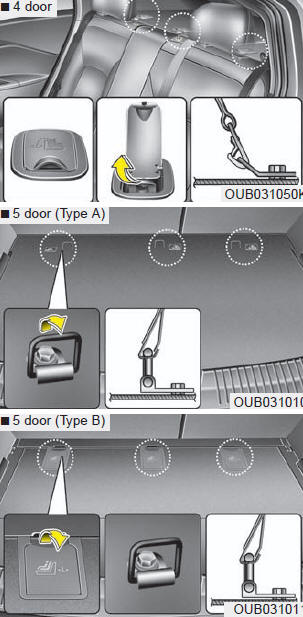
Securing a child restraint seat with tether anchorage system
Child restraint hook holders are located on the floor behind the rear seats.
1.Route the child restraint seat tether strap over the seatback.
For vehicles with adjustable headrest, route the tether strap under the headrest and between the headrest posts, otherwise route the tether strap over the top of the seatback.
2.Connect the tether strap hook to the appropriate child restraint hook holder and tighten to secure the child restraint seat.
WARNING - Tether strap
Never mount more than one child restraint to a single tether or to a single lower anchorage point. The increased load caused by multiple seats may cause the tethers or anchorage points to break.
Check that the child restraint system is secure by pushing and pulling it in different directions. Incorrectly fitted child restraints may swing, twist, tip or separate causing death or serious injury.
Securing a child restraint seat with child seat lower anchor system
Some child seat manufacturers make child restraint seats that are labeled as LATCH or LATCH-compatible child restraint seats. LATCH stands for "Lower Anchors and Tethers for Children". These seats include two rigid or webbing mounted attachments that connect to two LATCH anchors at specific seating positions in your vehicle. This type of child restraint seat eliminates the need to use seat belts to attach the child seat in the rear seats.
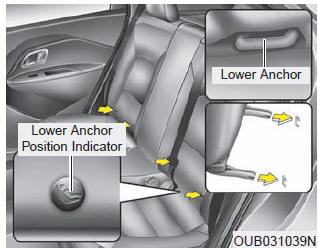
Child restraint symbols are located on the left and right rear seat backs to indicate the position of the lower anchors for child restraints.
WARNING - Unused rear seatbelts
Always fasten the seatbelts behind the child restraint seat when they are not used to secure the child seat. Failure to do so may result in child strangulation.
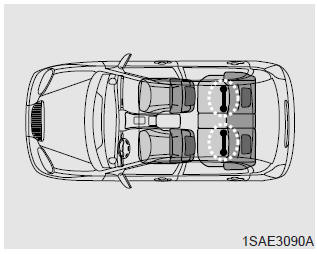
LATCH anchors have been provided in your vehicle. The LATCH anchors are located in the left and right outboard rear seating positions. Their locations are shown in the illustration. There is no LATCH anchor provided for the center rear seating position.
The LATCH anchors are located between the seatback and the seat cushion of the rear seat left and right outboard seating positions.
When you install your child's restraint system using the LATCH anchors buckle the shoulder lap belt, then lock the retractor and pull the belt to remove the slack in the belt so it lies flat against the vehicle seat.
Follow the child seat manufacturerŌĆÖs instructions to properly install child restraint seats with LATCH or LATCH-compatible attachments.
Once you have installed the LATCH child restraint, assure that the seat is properly attached to the LATCH and tether anchors.
Also, test the child restraint seat before you place the child in it. Tilt the seat from side to side. Also try to tug the seat forward. Check to see if the anchors hold the seat in place.
WARNING - LATCH lower anchors
Never attempt to attach a LATCH equipped seat in the center seating position. LATCH lower anchors are only to be used with the left and right rear outboard seating positions. You may damage the anchors or the anchors may fail and break in a collision.
 Child restraint system
Children riding in the car should sit in the rear seat and must always be properly
restrained to minimize the risk of injury in an accident, sudden stop or sudden
maneuver. According to accident s ...
 Air bag
(1) DriverŌĆÖs front air bag
(2) PassengerŌĆÖs front air bag
(3) Side impact air bag
(4) Curtain air bag
Even in vehicles with air bags, you and your passengers must always wear the
safety bel ...
See also:
Troubleshooting
1.
The lamp switch inputs can be checked using the GDS.
2.
To check the input value of lamp switch, select option "Body Control
Module ...
Door Switch Installation
1.
Install is reverse of removal.
...
Heated Steering wheel Inpection
1.
Measure a resistance of NTC and Heated pad.
A.
NTC resistance(Black / Yellow, Black) - 10.0 kΩ ┬▒ 10%
(25┬░C(77┬░F))
...
Categories
- Kia Rio Manuals Home
- Kia Rio YB 2017-2026 Owners Manual
- Kia Rio YB 2017-2026 Service Manual
- Kia Rio UB 2012-2017 Owners Manual
- Kia Rio UB 2012-2017 Service Manual
- Downloads
