 Kia Rio: Trunk Lid Replacement
Trunk Lid Assembly Replacement
|

| 1. |
Detach the clips, then remove the trunk lid trim (A).
|
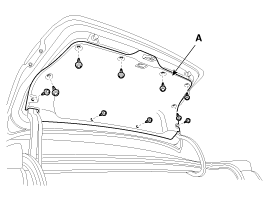
| 2. |
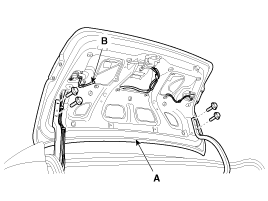
Disconnect wiring (B) and connectors.
|
| 3. |
After loosening the mounting bolts, then remove the trunk lid
(A).
|
| 4. |
Installation is the reverse of removal.
|

Trunk Lid Latch Replacement
| 1. |
Remove the trunk lid trim.
|
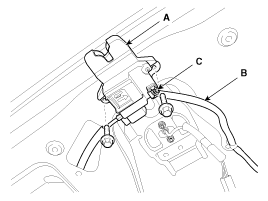
| 2. |
Disconnect the trunk lid latch connector (C).
|
| 3. |
Disconnect the cable (B), then loosen the latch assembly (A) mounting
bolts and remove.
|
| 4. |
Installation is the reverse of removal.
|
Trunk Lid Weatherstrip Replacement
| 1. |
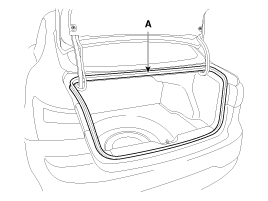
Remove the trunk lid weatherstrip (A).
|
| 2. |
Installation is the reverse of removal.
|
 Hood Adjustment
Hood Adjustment
1.
After loosening the hinge (A) mounting bolt, adjust the hood (B)
by moving it up or down, or right or left.
2.
Adjus ...
 Trunk Lid Adjustment
1.
After loosening the trunk lid hinge (A) mounting bolt, adjust
the trunk lid by moving it up or down, or right or left.
2.
Adjust the tru ...
See also:
Front Impact Sensor (FIS) Removal
ŌĆó
Removal of the airbag must be performed according to the
precautions/ procedures des ...
Rear Door Adjustment
Glass Adjustment
ŌĆó
Check the glass run channel for damage or deterioration,
and re ...
Tire Installation
1.
Apply tire soap or lubrication to the top and bottom tire beads.
2.
To fit the bottom bead, position the valve at the 5 oŌĆÖclock pos ...
Categories
- Kia Rio Manuals Home
- Kia Rio YB 2017-2026 Owners Manual
- Kia Rio YB 2017-2026 Service Manual
- Kia Rio UB 2012-2017 Owners Manual
- Kia Rio UB 2012-2017 Service Manual
- Downloads

Copyright ® www.kirmanual.com 2014-2026