 Kia Rio: Tail Gate Replacement
Tail Gate Assembly Replacement
| ŌĆó
|
When removing and installing the tail gate, an assistant
is necessary.
|
| ŌĆó
|
Take care not to damaged the tail gate and body.
|
|
|
1. |
Remove the following items :
|
|
2. |
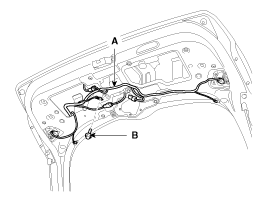
Loosen the mounting ground bolt (B).
|
|
3. |
Disconnect the connectors and tail gate wiring harness (A).
|
|
4. |
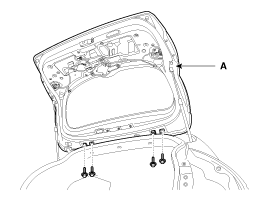
After loosening the mounting bolts, then remove the tail gate
assembly (A).
Tightening torque :
6.9 ~ 10.8 N.m (0.7 ~ 1.1 kgf.m, 5.1 ~ 8.0 lb-ft)
|
|
|
5. |
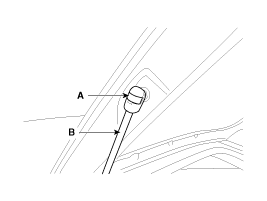
Using a screwdriver, lift the socket clips (A) up slightly on
both ends of the tail gate lifter (B).
|
|
6. |
Installation is the reverse of removal.
|
ŌĆó |
Make sure the tail gate opens properly and locks
securely.
|
|
ŌĆó |
Adjust the tail gate alignment.
|
|
ŌĆó |
Make sure the connectors are connected in properly.
|
|
ŌĆó |
Replace any damage clips.
|
|
|
Tail Gate Trim Replacement
| ŌĆó
|
When prying with a flat-tip screwdriver, wrap it with
protective tape, and apply protective tape around the related
parts, to prevent damage.
|
| ŌĆó
|
Put on gloves to protect your hands.
|
| ŌĆó
|
Take care not to scratch the body surface.
|
|
|
1. |
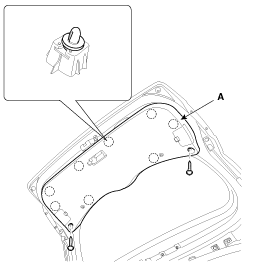
After loosening the mounting screws, then remove the tail gate
trim (A).
|
|
2. |
Installation is the reverse of removal.
|
ŌĆó |
Replace any damage clips.
|
|
|
Tail Gate Latch Replacement
| ŌĆó
|
When prying with a flat-tip screwdriver, wrap it with
protective tape, and apply protective tape around the related
parts, to prevent damage.
|
| ŌĆó
|
Put on gloves to protect your hands.
|
| ŌĆó
|
Take care not to scratch the body surface.
|
|
|
1. |
Remove the following items :
|
|
2. |
Disconnect the tail gate latch connector (A).
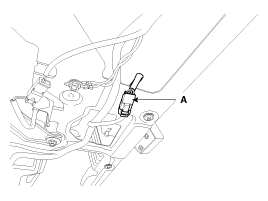
|
|
3. |
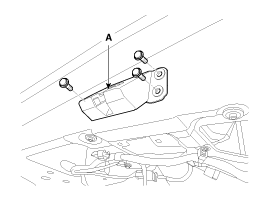
After loosening the mounting bolts, then remove the tail gate
latch assembly (A).
Tightening torque :
6.9 ~ 10.8 N.m (0.7 ~ 1.1 kgf.m, 5.1 ~ 8.0 lb-ft)
|
|
|
4. |
Installation is the reverse of removal.
|
ŌĆó |
Make sure the tail gate opens properly and locks
securely.
|
|
ŌĆó |
Make sure the connector is connected properly
and the connecting rod is connected properly.
|
|
ŌĆó |
Replace any damaged clips.
|
|
|
Tail Gate Outside Handle Replacement
| ŌĆó
|
When prying with a flat-tip screwdriver, wrap it with
protective tape, and apply protective tape around the related
parts, to prevent damage.
|
| ŌĆó
|
Put on gloves to protect your hands.
|
| ŌĆó
|
Take care not to scratch the body surface.
|
|
|
1. |
Remove the following items :
|
|
2. |
Disconnect the tail gate outside handle connector (A).
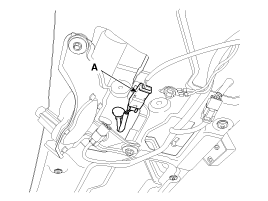
|
|
3. |
After loosening the mounting nuts, then remove the tail gate outside
handle (A).
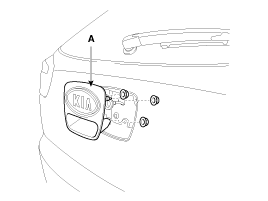
|
|
4. |
Installation is the reverse of removal
|
ŌĆó |
Make sure the tail gate opens properly and locks
securely.
|
|
ŌĆó |
Make sure the connector is connected properly
and the connecting rod is connected properly.
|
|
ŌĆó |
Replace any damaged clips.
|
|
|
Tail Gate Lift Replacement
| ŌĆó
|
Take care not to be closed the tail gate, when removing
the lift.
|
|
|
1. |
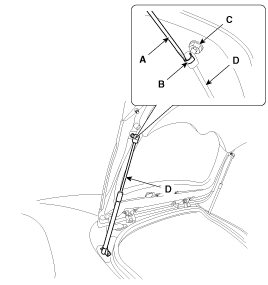
Using a screwdriver (A), lift up slightly the socket clips (B)
of both ends on the lifer (D), and then remove the lifter from the bracket
(C).
|
|
2. |
Push the socket of the lifter into the bracket for installation.
|
ŌĆó |
Make sure the tail gate lock and opens properly
and locks securely.
|
|
|
Tail Gate weatherstrip Replacement
| ŌĆó
|
Do not apply sealant to the body.
|
|
|
1. |
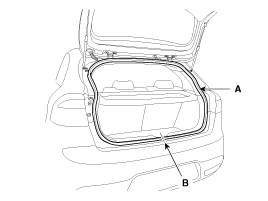
Remove the tail gate weatherstrip (A).
|
|
2. |
Installation is the reverse of removal.
|
ŌĆó |
Install the weatherstrip aligned with center line
(B).
|
|
|
1.
After loosening the trunk lid hinge (A) mounting bolt, adjust
the trunk lid by moving it up or down, or right or left.
2.
Adjust the tru ...
1.
After loosening the tail gate hinge (A) mounting bolt, adjust
the tail gate by moving it up or down, or right or left.
2.
Adjust the tai ...
See also:
Defroster
CAUTION - Conductors
To prevent damage to the conductors bonded to the inside surface of the rear
window, never use sharp instruments or window cleaners containing abrasives to clean
the window. ...
Door locks
Operating door locks from outside the vehicle
Turn the key toward the rear of the vehicle to unlock and toward the front
of the vehicle to lock.
If you lock/unlock the door with a key, all ...
Circuit Diagram
...
 Kia Rio: Tail Gate Replacement
 Trunk Lid Adjustment
 Tail Gate Adjustment


