 Kia Rio: Front Washer Motor Inspection
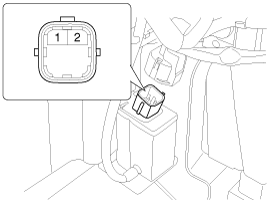
| Front Washer Motor |
| 1. |
With the washer motor connected to the reservoir tank, fill the
reservoir tank with water.
|

| 2. |
Connect positive (+) battery cables to terminal 1 and negative
(-) battery cables to terminal 2 respectively.
|
| 3. |
Check that the motor operates normally and the washer motor runs
and water sprays from the front nozzles.
|
| 4. |
If they are abnormal, replace the washer motor.
Connector No.1 : Windshield washer(+)
2 : Ground
|
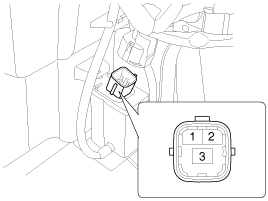
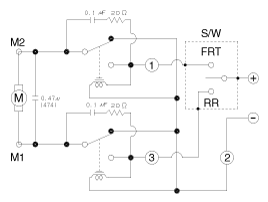
Front & Rear Washer Motor
| 1. |
With the washer motor connected to the reservoir tank, fill the
reservoir tank with water.
|
| 2. |
Connect positive (+) battery cables to terminal 1 and negative
(-) battery cables to terminal 2 respectively.
|
| 3. |
Check that the motor operates normally and the washer motor runs
and water sprays from the front nozzles.
|
| 4. |
If they are abnormal, replace the washer motor.
Connector No.1 : Windshield washer(+)
2 : Ground
3 : Rear washer (+)
|
 Front Wiper Motor Inspection
Speed Operation Check
1.
Remove the connector (A) from the wiper motor.
1. -
2. IGN+
3. Parking
4. High
5. GND
6. Low
...
 Front Washer Motor Removal
-
When servicing the washer pump, be careful not to damage
the washer pump seal.
...
See also:
Steering Column and Shaft Adjustment
After or before servicing the EPS system, perform the troubleshooting
and test procedure as follows. Compare the system condition with normal condition
in the table below and if abnormal symp ...
Installation
ŌĆó
Install the component with the specified torques.
ŌĆó
...
Special Service Tools
Tool (Number and name)
Illustration
Use
Alternator pulley remover wrench
(09373-27000)
Removal and installation of alternator pulley
...
Categories
- Kia Rio Manuals Home
- Kia Rio YB 2017-2026 Owners Manual
- Kia Rio YB 2017-2026 Service Manual
- Kia Rio UB 2012-2017 Owners Manual
- Kia Rio UB 2012-2017 Service Manual
- Downloads

Copyright ® www.kirmanual.com 2014-2026