 Kia Rio: Interior Trim Replacement
Door Scuff Trim Replacement
| ŌĆó
|
Put on gloves to protect your hands.
|
| ŌĆó
|
Use a plastic panel removal tool to remove interior trim
pieces to without marring the surface.
|
| ŌĆó
|
Take care not to bend or scratch the trim and panels.
|
|
|
1. |
Using a screwdriver or remover, remove the front door scuff trim
(A).
[Front]

|
|
2. |
Remove the rear seat cushion.
(Refer to the BD group - "Rear Seat")
|
|
3. |
After loosening the mounting screws, then remove the rear door
scuff trim (A).
[Rear]

|
|
4. |
Installation is the reverse of removal.
|
ŌĆó |
Replace any damage clips.
|
|
|
Cowl Side Trim Replacement
| ŌĆó
|
Put on gloves to protect your hands.
|
| ŌĆó
|
Use a plastic panel removal tool to remove interior trim
pieces to without marring the surface.
|
| ŌĆó
|
Take care not to bend or scratch the trim and panels.
|
|
|
1. |
Remove the front door scuff trim.
|
|
2. |
Remove the hood release handle.
(Refer to the BD group ŌĆō ŌĆ£HoodŌĆØ)
|
|
3. |
Using a screwdriver or remover, remove the cowl side trim (A).
|
|
4. |
Installation is the reverse of removal.
|
ŌĆó |
Replace any damage clips.
|
|
|
Front Pillar Trim Replacement
| ŌĆó
|
Put on gloves to protect your hands.
|
| ŌĆó
|
Use a plastic panel removal tool to remove interior trim
pieces to without marring the surface.
|
| ŌĆó
|
Take care not to bend or scratch the trim and panels.
|
|
|
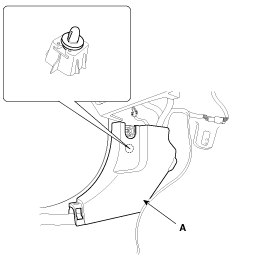
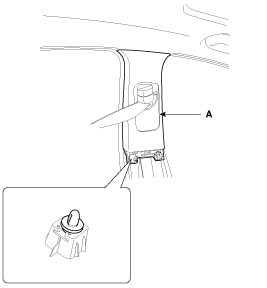
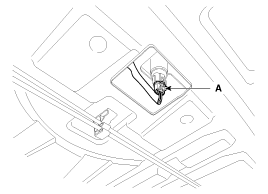
1. |
Using a screwdriver or remover, remove the front pillar trim (A).
|
ŌĆó |
Lock pin (B) is need to changed to new product
surely.
|
|
|
|
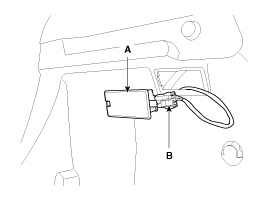
2. |
Disconnect the tweeter speaker connector (A).
|
|
3. |
Installation is the reverse of removal.
|
ŌĆó |
Replace any damage clips.
|
|
ŌĆó |
Make sure the connector is connected properly.
|
|
|
Center Pillar Trim Replacement
| ŌĆó
|
Put on gloves to protect your hands.
|
| ŌĆó
|
Use a plastic panel removal tool to remove interior trim
pieces to without marring the surface.
|
| ŌĆó
|
Take care not to bend or scratch the trim and panels.
|
|
|
1. |
Remove the following items :
|
|
2. |
Disconnect the battery negative cable, and wait for at least three
minutes before beginning work.
|
|
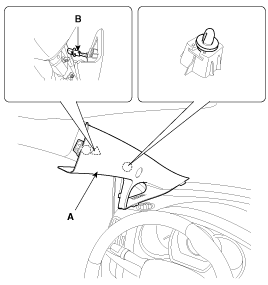
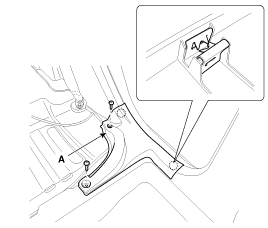
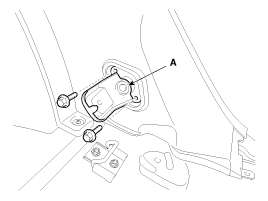
3. |
The seat belt anchor pretensioner (A) can be removed after pushing
the lock pin (B) as arrow direction.
|
|
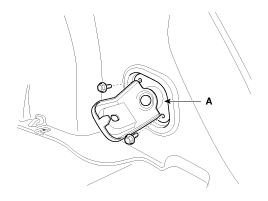
4. |
Using a screwdriver or remover, remove the center pillar lower
trim (A).

|
|
5. |
Using a screwdriver or remover, remove the center pillar upper
trim (A).
|
|
6. |
Installation is the reverse of removal.
|
ŌĆó |
Replace any damage clips.
|
|
|
Rear Pillar Trim Replacement
| ŌĆó
|
Put on gloves to protect your hands.
|
| ŌĆó
|
Use a plastic panel removal tool to remove interior trim
pieces to without marring the surface.
|
| ŌĆó
|
Take care not to bend or scratch the trim and panels.
|
|
|
1. |
Remove the following items :
| A. |
Rear seat assembly
(Refer to the BD group - "Rear Seat")
|
|
|
2. |
After loosening the mounting screws, then remove the rear door
scuff trim (A).
|
|
3. |
Using a screwdriver or remover, remove the rear transverse trim
(A).

|
|
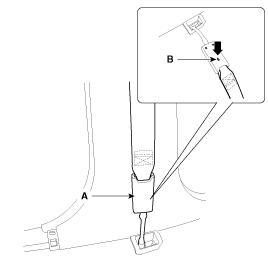
4. |
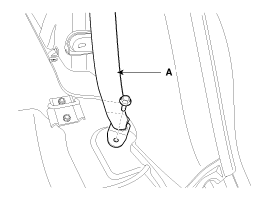
After loosening the mounting bolt, then remove the rear seat belt
lower anchor (A).
Tightening torque :
39.2 ~ 53.9 N.m (4.0 ~ 5.5 kgf.m, 28.8 ~ 39.8 lb-ft)
|
|
|
5. |
After loosening the mounting blots, then remove the rear seat
bracket (A).
|
|
6. |
Using a screwdriver or remover, remove the lamp (A).
|
|
7. |
Disconnect the lamp connector (B).
|
|
8. |
After loosening the mounting screws, then remove the luggage side
trim (A).
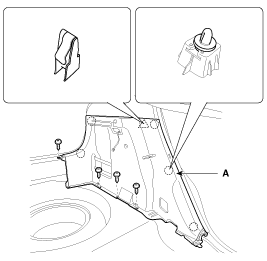
|
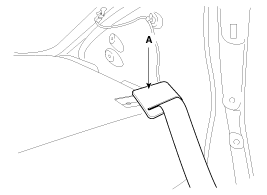
|
9. |
Remove the rear seat belt upper anchor cover (B).
|
|
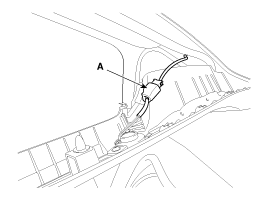
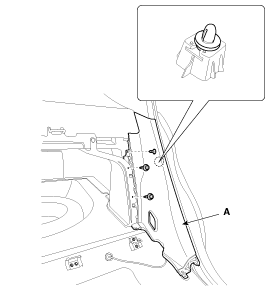
10. |
Using a screwdriver or remover, remove the rear pillar trim (A).

|
|
11. |
Installation is the reverse of removal.
|
ŌĆó |
Make sure the connectors are connected in properly.
|
|
ŌĆó |
Replace any damage clips.
|
|
|
| ŌĆó
|
Put on gloves to protect your hands.
|
| ŌĆó
|
Use a plastic panel removal tool to remove interior trim
pieces to without marring the surface.
|
| ŌĆó
|
Take care not to bend or scratch the trim and panels.
|
|
|
1. |
Using a screwdriver or remover, remove the rear pillar trim (A).
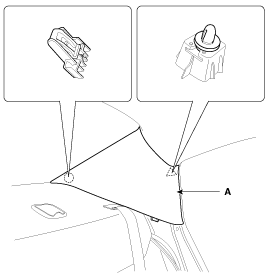
|
|
2. |
Installation is the reverse of removal.
|
ŌĆó |
Replace any damage clips.
|
|
|
Luggage Side Trim Replacement
| ŌĆó
|
Put on gloves to protect your hands.
|
| ŌĆó
|
Use a plastic panel removal tool to remove interior trim
pieces to without marring the surface.
|
| ŌĆó
|
Take care not to bend or scratch the trim and panels.
|
|
|
1. |
Remove the rear seat.
(Refer to the BD group ŌĆō ŌĆ£Rear SeatŌĆØ)
|
|
2. |
Remove the rear door scuff trim.
|
|
3. |
Remove the rear transverse trim.
|
|
4. |
After loosening the mounting screws, then remove the luggage side
trim.
|
|
5. |
Installation is the reverse of removal.
|
ŌĆó |
Replace any damage clips.
|
|
|
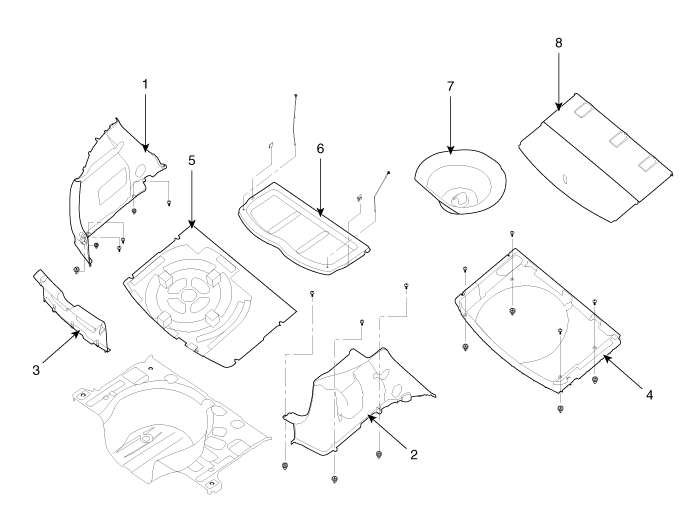
1 . Luggage side trim [LH]
2 . Luggage side trim [RH]
3 . Rear transverse trim
4 . Luggage floor box trim
|
5 . Luggage covering complete assembly (1)
6 . Covering shelf side damper
7 . Luggage tray
8 . Luggage covering complete assembly (2)
|
Rear Package Tray Trim Replacement
| ŌĆó
|
Put on gloves to protect your hands.
|
| ŌĆó
|
Use a plastic panel removal tool to remove interior trim
pieces to without marring the surface.
|
| ŌĆó
|
Take care not to bend or scratch the trim and panels.
|
|
|
1. |
Remove the rear seat assembly.
(Refer to the BD group ŌĆō ŌĆ£Rear SeatŌĆØ)
|
|
2. |
Using a screwdriver or remover, remove the rear pillar trim (A).

|
|
3. |
After loosening the mounting screws, then remove the rear door
scuff trim (A).
|
|
4. |
After loosening the mounting bolt, then remove the rear seat belt
lower anchor (A).
Tightening torque :
39.2 ~ 53.9 N.m (4.0 ~ 5.5 kgf.m, 28.8 ~ 39.8 lb-ft)
|

|
|
5. |
After loosening the mounting blots, then remove the rear seat
folding bracket (A).
|
|
6. |
After loosening the mounting clips and screws, then remove the
luggage partition trim (A).
|
|
7. |
After loosening the mounting clips and screw, then remove the
rear wheel housing trim (A).
|
|
8. |
Disconnect the high mounted stop lamp connector (A).
|
|
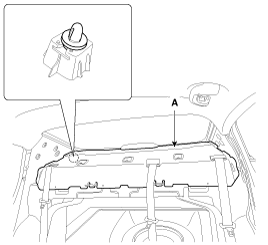
9. |
Remove the rear seat belt upper anchor cover (A).
|
|
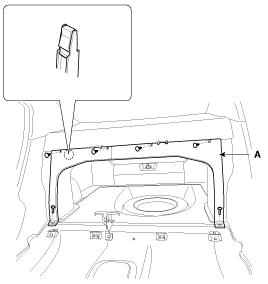
10. |
Remove the rear package tray trim (A).
|
|
11. |
Installation is the reverse of removal.
|
ŌĆó |
Make sure the connectors are connected in properly.
|
|
ŌĆó |
Replace any damage clips.
|
|
|
[5 Door, 4 Door]
1 . Front pillar trim
2 . Center pillar upper trim
3 . Center pillar lower trim
4 . Rear pillar trim [5 Door]
5 . Front door scuff trim
6 . ...
ŌĆó
Put on gloves to protect your hands.
ŌĆó
...


 Interior Trim Components
 Trunk Trim Replacement