
 Kia Rio: Shift Lever Removal
| Shift Lever Assembly Replacement |
| 1. |
Remove the center console.
(Refer to "interior (console)" in BD group)
|
| 2. |
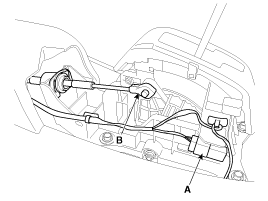
Disconnect the connector (A)
|
| 3. |
Remove the control cable (B).
|
| 4. |
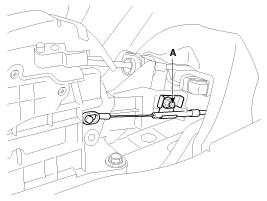
Remove the shift lock cable (A).
|
| 5. |
Remove the wiring clip (A).
|
| 6. |
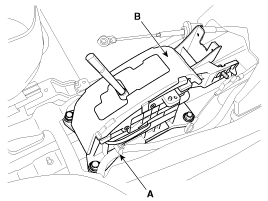
Remove the AT lever(shift lever) assembly (B) by removing the
bolts (4ea).
|
| 7. |
Installation is the reverse of removal.
Adjust the shift lock cable.
(Refer to "adjustment shift lock cable" in this group)
|

| Control Cable Assembly Replacement |
| 1. |
Remove the center console.
(Refer to "interior (console)" in BD group)
|
| 2. |
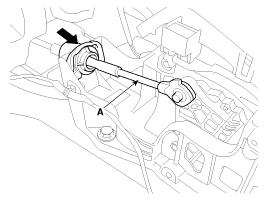
Remove the control cable (A).
|
| 3. |
Remove the crash pad.
(Refer to "Interior(Crash pad)" in BD group.)
|
| 4. |
Remove the heater unit.
(Refer to "Heater(Heater unit)" in HA group.)
|
| 5. |
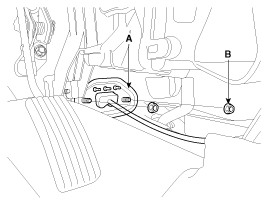
Remove the retainer (A) and nuts (B).
|
| 6. |
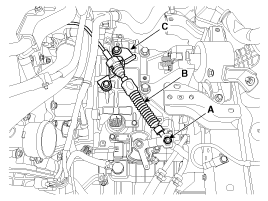
Remove the nut (A) from the manual control lever.
|
| 7. |
Remove the control cable (B) from the bracket (C) at transaxle
assembly side.
(Refer to "Automatic Transaxle" in this group)
|
| 8. |
Remove the control cable at cabin room.
|
| 9. |
Installation is the reverse of removal.
|
| Shift Lock Cable Replacement |
| 1. |
Remove the center console.
(Refer to "interior(console)"in BD group.
|
| 2. |
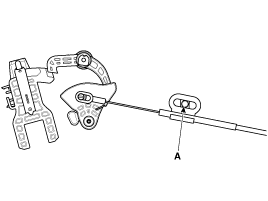
Remove the shift lock cable (A).
|
| 3. |
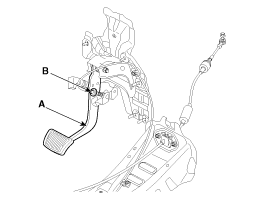
Remove the shift lock cable (B) from the brake pedal (A).
|
| 4. |
Installation is the reverse of removal.
|
 Shift Lever Components
1. Shift lever knob
2. Shift lever assembly
3. Control cable
4. Shift lock cable assembly
5. Retainer
6. Brake pedal assembly
...
 Shift Lever Adjustment
Adjusting the control cable
1.
Set room side AT lever(shift lever) and automatic transaxle side
manual control lever to "N" position.
...
See also:
Audio Unit Description
Introduction to CD
•
If the temperature inside the car is too high, open the car windows
for ventilation before using your car audio.
•
I ...
ESC Operation Mode
ESC Hydraulic System Diagram
1.
ESC Non-operation : Normal braking.
Solenoid valve
Continuity
Valve
Motor ...
Windshield Wiper-Washer Switch Inspection
Wiper And Washer Switch Inspection
With the multifunction switch in each position, make sure that continuity
exists between the terminals below. If continuity is not as specified, replace
...
Categories
- Kia Rio Manuals Home
- Kia Rio YB 2017-2026 Owners Manual
- Kia Rio YB 2017-2026 Service Manual
- Kia Rio UB 2012-2017 Owners Manual
- Kia Rio UB 2012-2017 Service Manual
- Downloads

Copyright © www.kirmanual.com 2014-2026