 Kia Rio: Rear Door Replacement
Door Trim Replacement
| [5 Door] |
|

| 1. |
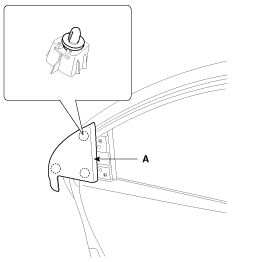
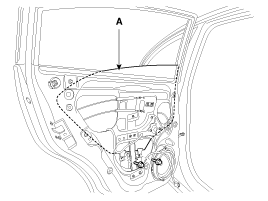
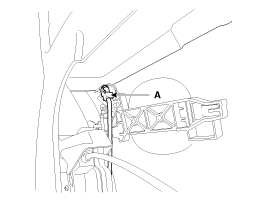
Using a screwdriver or remover, remove the rear door delta inner
cover (A).
|
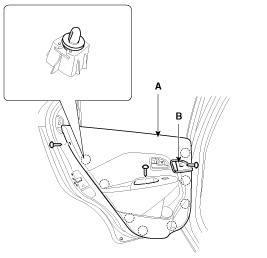
| 2. |
After loosening the mounting screw, then remove the rear door
inside handle housing (B).
|
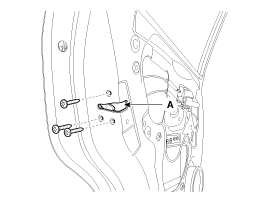
| 3. |
After loosening the mounting screws, then remove the rear door
trim (A).
|
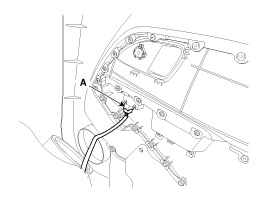
| 4. |
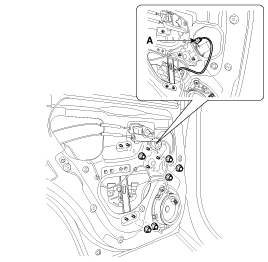
Disconnect the power window connector (A).
|
| 5. |
Installation is the reverse of removal.
|

| [4 Door] |
|
| 1. |
After loosening the mounting screw, then remove the rear door
inside handle housing (B).
|
| 2. |
After loosening the mounting screws, then remove the rear door
trim (A).
|

| 3. |
Disconnect the power window switch connector (A).
|
| 4. |
Installation is the reverse of removal.
|
Inside Handle Replacement
| 1. |
Remove the following items :
|
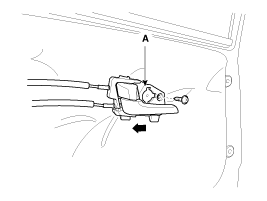
| 2. |
After loosening the mounting screw, then remove the rear door
inside handle (A).
|
| 3. |
Disconnect the rear door inside handle cable (A).
|
| 4. |
Installation is the reverse of removal.
|
Glass Replacement
| [5 Door] |
| 1. |
Remove the following items :
|
| 2. |
After loosening the mounting screw, then remove the rear door
inside handle (A).
|
| 3. |
Disconnect the rear door inside handle cable (A).
|
| 4. |
Disconnect the rear door speaker connector (A).
|
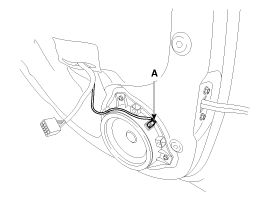
| 5. |
After loosening the mounting screws, then remove the rear door
trim seal mounting bracket (B).
|
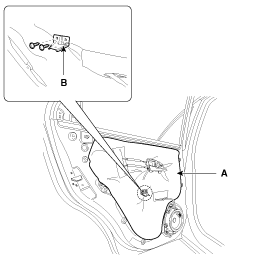
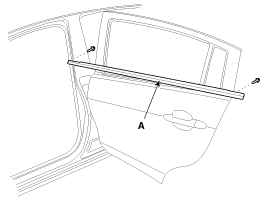
| 6. |
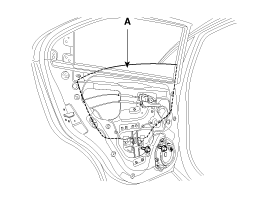
Remove the rear door trim seal (A).
|
| 7. |
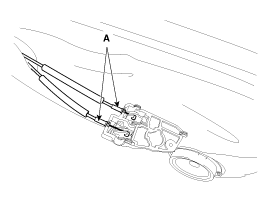
Loosen the rear door delta moulding mounting screws.
|

| 8. |
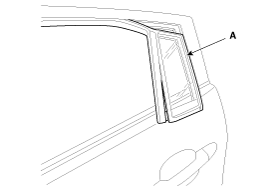
Remove the rear door delta moulding (A).
|
| 9. |
Loosen the rear door channel mounting nuts.
|
| 10. |
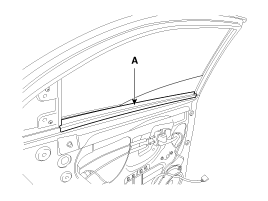
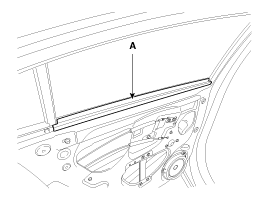
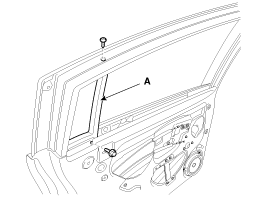
Remove the rear door belt inside weatherstrip (A).
|
| 11. |
Carefully move the glass (A) until you can see the bolts, then
loosen them. Separate the glass from the glass run and carefully pull
the glass out through the window slot.
|
| 12. |
Installation is the reverse of removal.
|
| [4 Door] |
| 1. |
Remove the rear door trim.
|
| 2. |
After loosening the mounting screw, then remove the rear door
inside handle (A).
|
| 3. |
Disconnect the rear door inside handle cable (A).
|
| 4. |
Disconnect the rear door speaker connector (A).
|
| 5. |
After loosening the mounting screws, then remove the rear door
trim seal mounting bracket (B).
|
| 6. |
Remove the rear door trim seal (A).
|
| 7. |
After loosening the mounting screw, then remove the rear door
inside handle (A).
|
| 8. |
After loosening the mounting screws, then remove the rear door
belt outside weatherstrip (A).
|
| 9. |
Loosen the rear door window run & fixed glass (A) mounting screw
and bolt.
|
| 10. |
Remove the rear door window run & fixed glass (A).
|
| 11. |
Loosen the rear door channel mounting nuts.
|
| 12. |
Carefully move the glass (A) until you can see the bolts, then
loosen them. Separate the glass from the glass run and carefully pull
the glass out through the window slot.
|
| 13. |
Installation is the reverse of removal.
|
Speaker Replacement
| 1. |
Remove the following items :
|
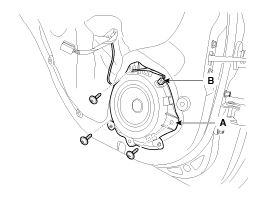
| 2. |
Disconnect the speaker connector (B).
|
| 3. |
After loosening the mounting screws, then remove the rear door
speaker (A).
|
| 4. |
Installation is the reverse of removal.
|
Door Power Window Regulator Assembly Replacement
| 1. |
Remove the following items :
|
| 2. |
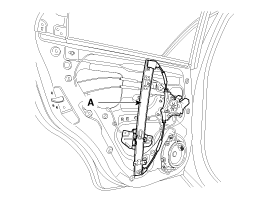
Loosen the rear door power window regulator mounting nuts.
|
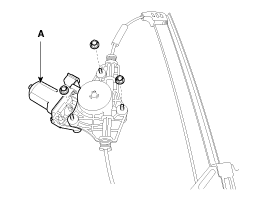
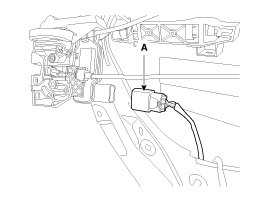
| 3. |
Disconnect the rear door power window motor connector (A).
|
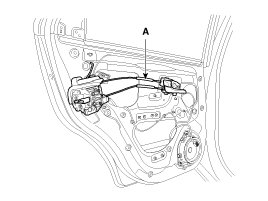
| 4. |
Remove the rear door power window regulator assembly (A).
|
| 5. |
After loosening the mounting nuts, then remove the rear door power
window motor (A).
|
| 6. |
Installation is the reverse of removal.
|
Outside Handle Replacement
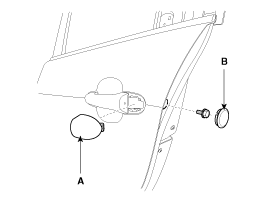
| 1. |
Remove the hole plug (B).
|
| 2. |
After loosening the mounting bolt, then remove the outside handle
cover (A).
|
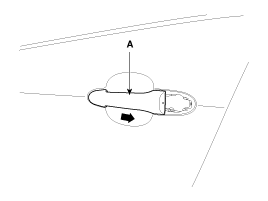
| 3. |
Remove the outside handle (A) by sliding it rearward.
|
| 4. |
Installation is the reverse of removal.
|
Door Latch Replacement
| 1. |
Remove the following items :
|
| 2. |
Loosen the rear door channel mounting nuts.
|
| 3. |
Remove the rear door channel (A).
|
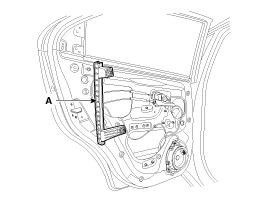
| 4. |
Disconnect the outside handle rod (A).
|
| 5. |
Loosen the rear door latch (A) mounting screws.
|
| 6. |
Remove the rear door latch assembly (A).
|
| 7. |
Disconnect the rear door latch connector (A).
|
| 8. |
Installation is the reverse of removal.
|
Door Side Weaterstrip Replacement
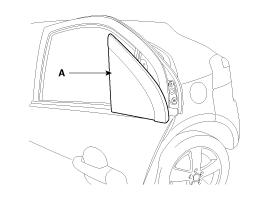
| 1. |
Detach the clips, then remove the rear door side weatherstrip
(A).
[5 Door]
[4 Door]
|
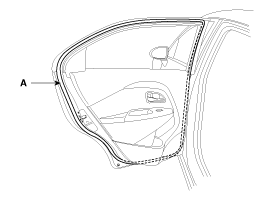
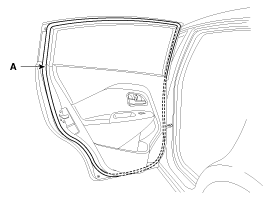
| 2. |
Installation is the reverse the removal.
|
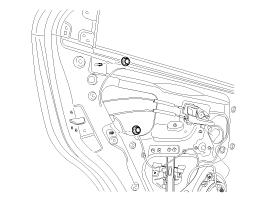
 Rear Door Components
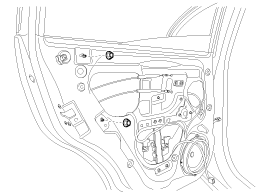
1 . Rear door trim
2 . Rear door trim seal
3 . Rear door panel
4 . Rear door belt inside weatherstrip
5 . Rear door belt outside weatherstrip
6 . Rear door delta lower ...
 Rear Door Adjustment
Glass Adjustment
ŌĆó
Check the glass run channel for damage or deterioration,
and re ...
See also:
Front Wheel Speed Sensor Components
1. Front wheel speed sensor connector
2. Front wheel speed sensor
...
Removal
ŌĆó
Do not spill brake fluid on the vehicle; it may damage
the paint if brake fluid does ...
Shift Lever Removal
Shift Lever Assembly Replacement
1.
Remove the floor Interior console assembly.
(Refer to "Interior (Console)" in BD group)
...
Categories
- Kia Rio Manuals Home
- Kia Rio YB 2017-2026 Owners Manual
- Kia Rio YB 2017-2026 Service Manual
- Kia Rio UB 2012-2017 Owners Manual
- Kia Rio UB 2012-2017 Service Manual
- Downloads

Copyright ® www.kirmanual.com 2014-2026