 Kia Rio: Front Wiper Motor Removal
| 1. |
Loosen the windshield wiper arm nut (A) after removing a wiper
cap (B).
|
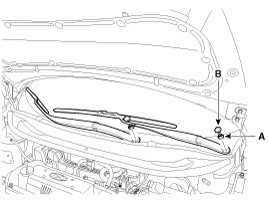
| 2. |
Remove the windshield wiper arm and blade.
|
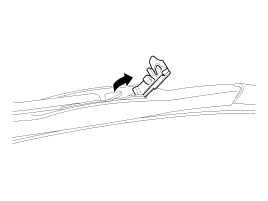
| 3. |
If necessary, release the wiper blade fixing clip by pulling up
and remove the wiper blade from the inside radius of wiper arm.
|
| 4. |
Disconnect the washer hose (A) connected to cowl top cover.
|
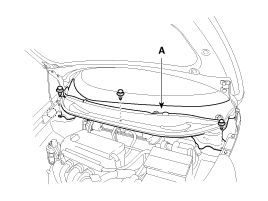
| 5. |
Remove the weather strip and the cowl top cover (B) after removing
rivets.
|
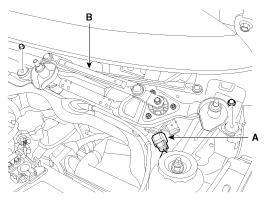
| 6. |
Disconnect the wiper motor connector (A) from the wiper motor
& linkage assembly.
|
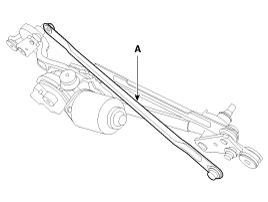
| 7. |
Remove the windshield wiper motor and linkage assembly (B) after
removing 2 bolts.
|
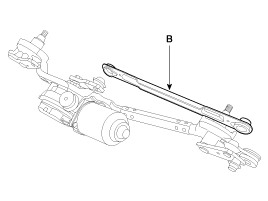
| 8. |
Hold the wiper motor crank arm and remove the linkages (A) (B)
from the wiper motor crank arm.
|

| 9. |
Loosen 3 bolts and remove the wiper motor(A) from the wiper motor
crank arm.
|

 Front Wiper Motor Component Location
1. Cap
2. Nut
3. Wiper arm & blade
4. Rivet
5. Cowl top cover
6. Bolt
7. Wiper motor & linkage assembly
...
 Front Wiper Motor Installation
1.
Install the wiper motor.
2.
Install the crank arm.
3.
Install the lower and upper linkage to the wiper motor ...
See also:
Dynamic Damper Replacement
1.
Remove the front driveshaft. (Refer to DS group - ŌĆ£Front DriveshaftŌĆØ)
2.
Remove the TJ joint assembly. (Refer to DS group - ŌĆ£TJ jointŌĆ ...
BCM connectors
Pin No.
Connector A
Connector B
Connector C
1
Battery (+)
K_LINE
Turn signal switch (RH)
2
Ignition 2
Centr ...
Components Location
1. Automatic transaxle
2. Valve body assembly
3. Oil pump assembly
...
Categories
- Kia Rio Manuals Home
- Kia Rio YB 2017-2026 Owners Manual
- Kia Rio YB 2017-2026 Service Manual
- Kia Rio UB 2012-2017 Owners Manual
- Kia Rio UB 2012-2017 Service Manual
- Downloads

Copyright ® www.kirmanual.com 2014-2026