
 Kia Rio: Adjustment
| Parking Brake Lever Stroke Adjustment |
| 1. |
Remove the floor console.
(Refer to Body group - "Floor console")
|
| 2. |
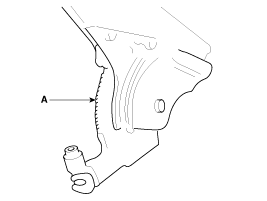
Apply a coating of the specified grease to each sliding parts
(A) of the ratchet plate or the ratchet pawl.
|
| 3. |
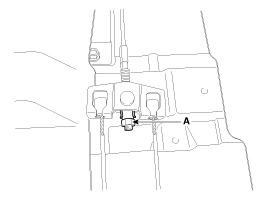
Install the parking brake cable adjuster, then adjust the parking
brake lever stroke by turning adjusting nut (A).
|

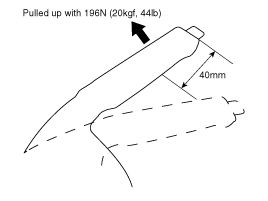
| 4. |
Release the parking brake lever fully, and check that parking
brakes do not drag when the rear wheels are turned. Readjust if necessary.
|
| 5. |
Make sure that the parking brakes are fully applied when the parking
brake lever is pulled up fully.
|
| 6. |
Install thd floor console.
(Refer to the Body group - "Floor console")
|
| Parking Brake Shoe Clearance Adjustment |
Rear Drum Brake Type
| 1. |
Depress the brake pedal several times to set the self-adjusting
brake.
|
Rear Disc Brake Type
Re-setting of the parking brake is necessary after overhauling
the caliper body, or if the brake calipers, housing, parking brake cable
or brake discs have been changed.
|
| 1. |
Remove the floor console to reach the adjusting nut.
|
| 2. |
Loosen the parking brake cable until both operating levers rest
in fully off position.
|
| 3. |
Bring the brake pads in their operating position by pressing the
brake pedal down several times until there is resistance.
|
| 4. |
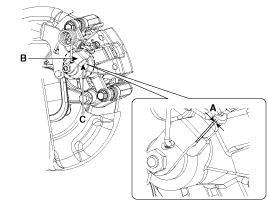
Tension the parking brake cable by tightening the adjusting nut,
until the operating levers on both calipers lift from the stop, up to
a distance of (A) between operating lever (B) and stopper (C).
|
| 5. |
Parking brake lever in the car must be in fully loosened position.
|
| 6. |
If the handbrake cables where changed, actuate the parking brake
a few times with maximum force to stretch the parking brake cables,
and then control adjusting as above.
|
| 7. |
Check the wheels of their free operation.
|
| 8. |
Install the floor console.
|
| 9. |
Test drive.
|
 Installation
Rear Disc Brake Type
1.
Install the parking brake cable.
2.
Install the parking brake cable (A), and then install the clip
(B ...

See also:
Air bag
(1) Driver’s front air bag
(2) Passenger’s front air bag
(3) Side impact air bag
(4) Curtain air bag
Even in vehicles with air bags, you and your passengers must always wear the
safety bel ...
A/C Pressure Transducer Description
The A/C Pressure Transducer (APT) convert the pressure value of high pressure
line into voltage value after measure it. By converted voltage value, engine
ECU controls cooling fan by operatin ...
ESC Control Module Components
1. Front - left tube
2. Rear - right tube
3. Rear - left tube
4. Front - right tube
5. MC2
6. MC1
7. ESC control module (HECU)
8. Damper
9. Bracket
...
Categories
- Kia Rio Manuals Home
- Kia Rio YB 2017-2026 Owners Manual
- Kia Rio YB 2017-2026 Service Manual
- Kia Rio UB 2012-2017 Owners Manual
- Kia Rio UB 2012-2017 Service Manual
- Downloads

Copyright © www.kirmanual.com 2014-2026