 Kia Rio: Smart key unit Removal
Smart key unit
| [USA] |
| 1. |
Disconnect the negative(-) battery terminal.
|
| 2. |
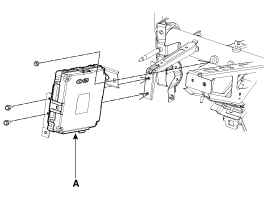
Remove the smart key unit (A) after disconnecting the connector
and loosening the mounting nut (1EA) and bolts (2EA).
|
| [CANADA] |
| 1. |
Disconnect the negative(-) battery terminal.
|
| 2. |
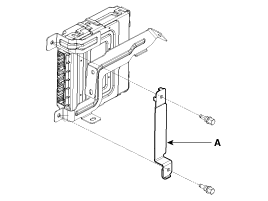
Remove the bracket (A) after loosening the bolts (2EA).
|
| 3. |
Remove the smart key unit (A) after disconnecting the connector
and loosening the mounting nut (1EA) and bolts (2EA).
|
Interior 1 Antenna
|
| 1. |
Disconnect the negative(-) battery terminal.
|
| 2. |
Remove the heater & A/C controller..
(Refer to the HA group - "Controller")
|
| 3. |
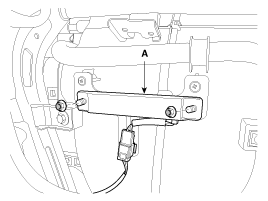
Remove the interior 1 antenna (A) after disconnecting the connector
and loosening the nuts (2EA).
|
Interior 2 Antenna
| 1. |
Disconnect the negative(-) battery terminal.
|
| 2. |
Remove the console.
(Refer to the BD group - "Console")
|
| 3. |
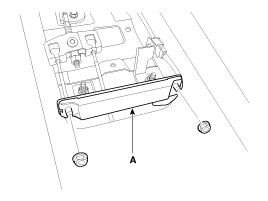
Disconnect the interior 2 antenna connector, then remove the interior
2 antenna (A) after loosening nuts (2EA).
|
Trunk Antenna
| 1. |
Disconnect the negative(-) battery terminal.
|
| 2. |
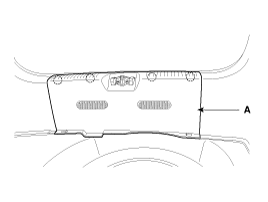
Remove the trunk transverse trim (A).
|
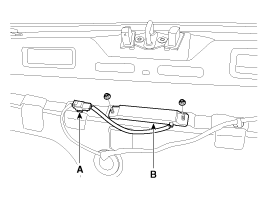
| 3. |
Disconnect the trunk antenna connector (A) and remove the trunk
antenna (B) after loosening nuts (2EA).
|
Exterior Bumper Antenna
| 1. |
Disconnect the negative(-) battery terminal.
|
| 2. |
Remove the rear bumper.
(Refer to the BD group - "Rear bumper")
|
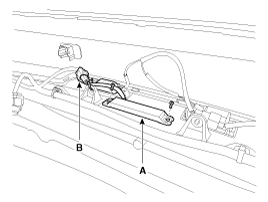
| 3. |
Disconnect the antenna connector (B) and remove the exterior bumper
antenna (A) after loosening the screws (2EA).
|
Buzzer
| 1. |
Disconnect the negative(-) battery terminal.
|
| 2. |
Remove the left side wheel guard.
|
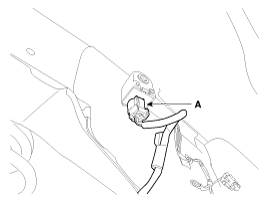
| 3. |
Remove the external buzzer (A) after disconnecting the connector.
|
Door Outside Handle
| 1. |
Disconnect the negative (-) battery terminal.
|
| 2. |
Remove the front door module.
(Refer to the BD group - "Front door")
|
| 3. |
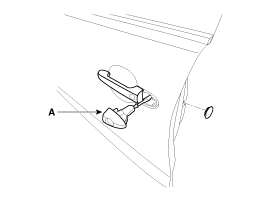
After loosening the mounting bolt, then remove the outside handle
cover (A).
|
| 4. |
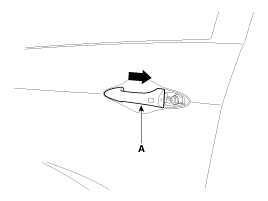
Remove the outside handle (A) by sliding it rearward.
|
| 5. |
Disconnect the outside handle connector.
|
Trunk lid open switch
| 1. |
Disconnect the negative(-) battery terminal.
|
| 2. |
Remove the trunk door trim.
(Refer to the BD group - "Trunk")
|
| 3. |
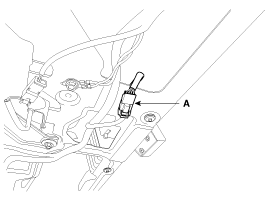
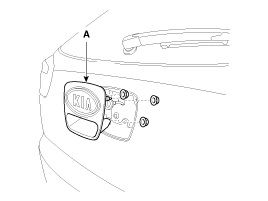
Disconnect the trunk lid open switch connector (A).
|
| 4. |
Remove the trunk open switch (A) from the trunk garnish.
|
 Smart key unit Inspection
Smart Key Unit
-
Refer to the BE group - inspection / self diagnosis with GDS.
Smart Key Switch
-
Refer to the BE group - inspection / self di ...
 Smart key unit Installation
Smart Key Unit
1.
Install the smart key unit.
2.
Install the smart key unit mounting nuts and connector.
3.
...
See also:
Curtain Airbag (CAB) Module Description
Curtain airbags are installed inside the headliner (LH and RH) and protect
the driver and passenger from danger when side crash occurs. The SRSCM determines
deployment of curtain airbag by us ...
Front Hub / Knuckle Reassembly
1.
Install the hub bearing to the knuckle assembly.
(1)
Lay the knuckle assembly (A) on press.
(2)
...
Vehicle parasitic current inspection
1.
Turn the all electric devices OFF, and then turn the ignition
switch OFF.
2.
Close all doors except the engine hood, and then lock all d ...
Copyright ® www.kirmanual.com 2014-2025

