
 Kia Rio: Power Window Switch Inspection
Power Window Main Switch Inspection
| 1. |
Disconnect the negative (-) battery terminal.
|
| 2. |
Remove the front door trim panel.
(Refer to the BD group - "Front door")
|
| 3. |
Disconnect the connector from the switch.
|
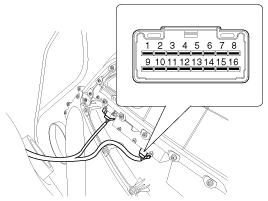
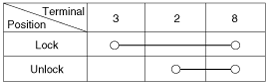
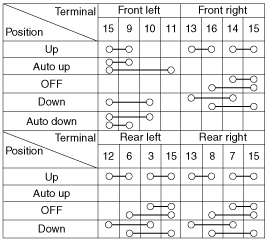
| 4. |
Check for continuity between the terminals in each switch position
according to the table. If the continuity condition is not normal, replace
the switch.
|
Passenger Power Window Switch Inspection
| 1. |
Disconnect the negative (-) battery terminal.
|
| 2. |
Remove the front door trim panel.
(Refer to the BD group - "Front door")
|
| 3. |
Disconnect the connector from the switch.
|
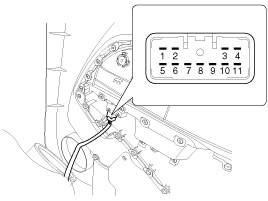
| 4. |
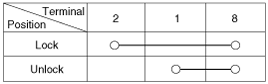
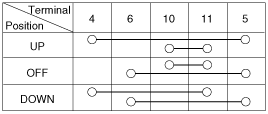
Check for continuity between the terminals in each switch position
according to the table. If the continuity condition is not normal, replace
the switch.
|
Rear Power Window Switch Inspection
| 1. |
Disconnect the negative (-) battery terminal.
|
| 2. |
Remove the rear door trim panel.
(Refer to the BD group - "Rear door")
|
| 3. |
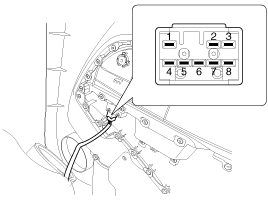
Disconnect the 8P connector from the switch.
|
| 4. |
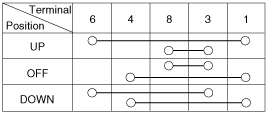
Check for continuity between the terminals in each switch position
according to the table. If the continuity condition is not normal, replace
the switch.
|
Rear Glass Defogger
 Power Window Switch Circuit Diagram
Driver Power Window Switch
Passenger Power Window Switch
Rear Power Window Switch
...
See also:
Brake Booster Operating Test
For simple checking of the brake booster operation, carry out the following
tests.
1.
Run the engine for one or two minutes, and then stop it. If the
pedal depresses ...
Removal
1.
Remove the rear wheel & tire.
Tightening torque:
88.3 ~ 107.9 N.m (9.0 ~ 11.0 kgf.m, 65.1 ~ 79.6 lb-ft)
...
Disassembly
Engine removal is required for this procedure. (Refer to Engine and transaxle
assembly removal in this group)
1.
M/T : Remove the fly wheel.
2.
...
Power Window Switch Circuit Diagram
Driver Power Window Switch
Passenger Power Window Switch
Rear Power Window Switch
...

See also:
Brake Booster Operating Test
For simple checking of the brake booster operation, carry out the following
tests.
1.
Run the engine for one or two minutes, and then stop it. If the
pedal depresses ...
Removal
1.
Remove the rear wheel & tire.
Tightening torque:
88.3 ~ 107.9 N.m (9.0 ~ 11.0 kgf.m, 65.1 ~ 79.6 lb-ft)
...
Disassembly
Engine removal is required for this procedure. (Refer to Engine and transaxle
assembly removal in this group)
1.
M/T : Remove the fly wheel.
2.
...
Categories
- Kia Rio Manuals Home
- Kia Rio YB 2017-2026 Owners Manual
- Kia Rio YB 2017-2026 Service Manual
- Kia Rio UB 2012-2017 Owners Manual
- Kia Rio UB 2012-2017 Service Manual
- Downloads

Copyright © www.kirmanual.com 2014-2026