 Kia Rio: Light bulbs
WARNING - Lights
Prior to working on the light, firmly apply the parking brake, ensure that the ignition switch is turned to the ŌĆ£LOCKŌĆØposition and turn off the lights to avoid burning your fingers or receiving an electric shock.
Use only the bulbs of the specified wattage.
CAUTION - Light replacement
Be sure to replace the burnedout bulb with one of the same wattage rating. Otherwise, it may cause damage to the fuse or electric wiring system.
If you donŌĆÖt have necessary tools, the correct bulbs and the expertise, consult an authorized Kia dealer.
In many cases, it is difficult to replace vehicle light bulbs because other parts of the vehicle must be removed before you can get to the bulb. This is especially true if you have to remove the headlight assembly to get to the bulb(s). Removing/installing the headlight assembly can result in damage to the vehicle.
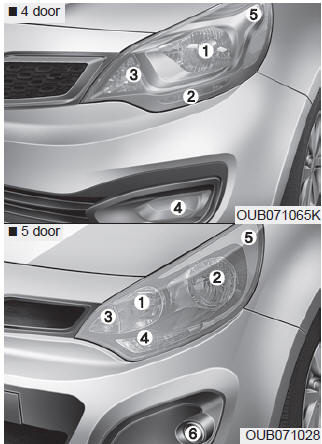
Headlight, position light, turn signal light, side marker light and front fog light bulb replacement
- ŌĆó 4 door
(1) Headlight (High/Low)
(2) Position light
(3) Front turn signal light
(4) Front fog light
- ŌĆó 5 door
(1) Headlight (High)
(2) Headlight (Low)
(3) Front turn signal light
(4) Position light
(5) Front side marker
(6) Front fog light
Headlight bulb
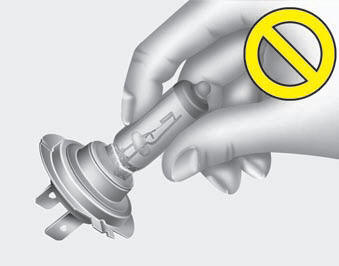
WARNING - Halogen bulbs
Handle halogen bulbs with care. Halogen bulbs contain pressurized gas that will produce flying pieces of glass if broken.
Always handle them carefully, and avoid scratches and abrasions. If the bulbs are lit, avoid contact with liquids.
Never touch the glass with bare hands. Residual oil may cause the bulb to overheat and burst when lit. A bulb should be operated only when installed in a headlight.
If a bulb becomes damaged or cracked, replace it immediately and carefully dispose of it.
Wear eye protection when changing a bulb. Allow the bulb to cool down before handling it.
1.Turn off the engine and open the hood.
2.Remove the front bumper upper cover.
3.Remove the headlight assembly from the body of the vehicle. If you can reach the bulb without removing the headlight assembly, you do not need to do step 2 and 3.
4.Disconnect the power connector(s) from the back of the headlight assembly.
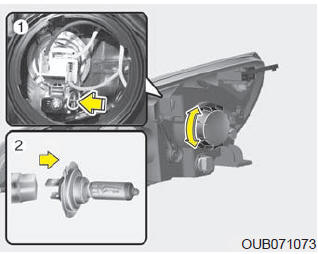
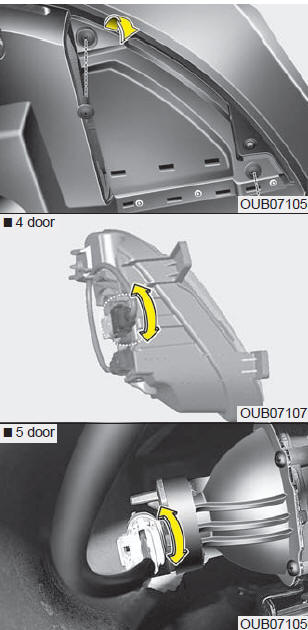
Headlight(High/Low)
- ŌĆó 4 door
5.Remove the headlight bulb cover by turning it counterclockwise.
6.Unsnap the headlight bulb retaining wire by depressing the end and pushing it right ward.
7.Pull the bulb out of the socket.
8.Insert a new bulb into the socket.
9.Install the socket in the assembly by aligning the shape on the bulb housing in the assembly. Pushing the spring holder in to the slot.
10. Install the headlight bulb cover by turning it clockwise

Headlight (High)
- ŌĆó 5 door
5.Remove the headlight bulb cover by turning it counterclockwise.
6.Unsnap the headlight bulb retaining wire by depressing the end and pushing it down ward.
7.Pull the bulb out of the socket.
8.Insert a new bulb into the socket.
9.Install the socket in the assembly by aligning the shape on the bulb housing in the assembly. Pushing the spring holder in to the slot.
10. Install the headlight bulb cover by turning it clockwise.
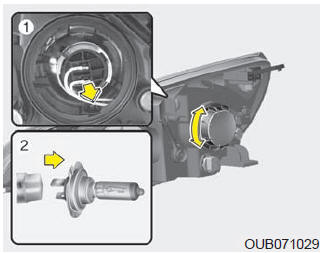
Headlight (Low)
- ŌĆó 5 door
Follow the steps 1 to 4 from the previous section.
5.Remove the headlight bulb cover by turning it counterclockwise.
6.Remove the socket from the assembly by turning the socket counterclockwise until the tabs on the socket align with the slots on the assembly.
7.Pull the bulb out of the socket.
8.Insert a new bulb into the socket.
9.Install the socket in the assembly by aligning the tabs on the socket with the slots in the assembly.
Push the socket into the assembly and turn the socket clockwise.
10. Install the headlight bulb cover by turning it clockwise.
If the headlight aiming adjustment is necessary after the headlight assembly is reinstalled, consult an authorized Kia dealer.
Turn signal light/Position light or Side marker
Follow the steps 1 to 4 from the previous page.
5.Remove the socket from the assembly by turning the socket counterclockwise until the tabs on the socket align with the slots on the assembly.
6.Remove the bulb from the socket by pressing it in and rotating it counterclockwise until the tabs on the bulb align with the slots in the socket. Pull the bulb out of the socket
7.Insert a new bulb by inserting it into the socket and rotating it until it locks into place.
8.Install the socket in the assembly by aligning the tabs on the socket with the slots in the assembly.
Push the socket into the assembly and turn the socket clockwise.
Position light (if equipped)
If the light bulb does not operate, have the vehicle checked by an authorized Kia dealer.
Front fog light bulbs (if equipped)
1.Remove the under cover by rotating the screws.
2.Reach your hand into the back of the front bumper.
3.Disconnect the power connector from the socket.
4.Remove the bulb-socket from the housing by turning the socket counter clockwise until the tabs on the socket align with the slots on the housing.
5.Install the new bulb-socket into the housing by aligning the tabs on the socket with the slots in the housing.
Push the socket into the housing and turn the socket clockwise.
6 Connect the power connector to the socket.
Side repeater light bulb replacement (if equipped)
Type A
If the light LED is not operating, have the vehicle checked by an authorized Kia dealer.
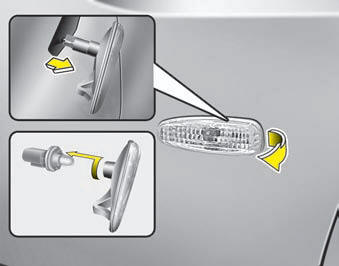
Type B
1.Remove the light assembly from the vehicle by prying the lens and pulling the assembly out.
2.Disconnect the bulb electrical connector.
3.Separate the socket and the lens parts by turning the socket counterclockwise until the tabs on the socket align with the slots on the lens part.
4.Remove the bulb by pulling it straight out.
5.Insert a new bulb in the socket.
6.Reassemble the socket and the lens part.
7.Connect the bulb electrical connector.
8.Reinstall the light assembly to the body of the vehicle.

Rear combination light bulb replacement
(1) Stop and tail light
(2) Rear turn signal light
(3) Back-up light
(4) Tail light
Stop and tail light (LED type, if equipped)
If the light (LED) does not operate, have the vehicle checked by an authorized Kia dealer.
Outside light Rear turn signal light and tail/stop light
- ŌĆó 4 door
1.Turn off the engine.
2.Open the trunk lid.
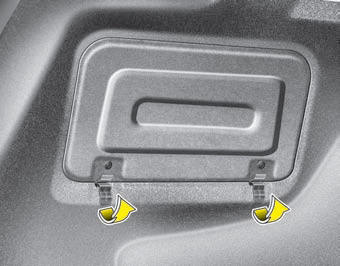
3.Remove the service cover by pulling out the service cover.
4.Remove the socket from the assembly by turning the socket counterclockwise until the tabs on the socket align with the slots on the assembly.
5.Remove the bulb from the socket by pressing it in and rotating it counterclockwise until the tabs on the bulb align with the slots in the socket. Pull the bulb out of the socket.
6.Insert a new bulb by inserting it into the socket and rotating it until it locks into place.
7.Install the socket in the assembly by aligning the tabs on the socket with the slots in the assembly.
Push the socket into the assembly and turn the socket clockwise.
8.Install the service cover by putting it into the service hole.
- ŌĆó 5 door
1.Turn off the engine.
2.Open the tailgate.
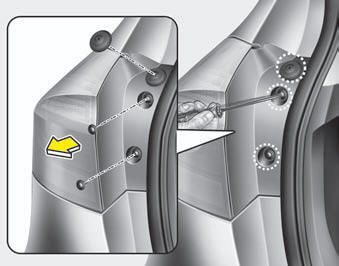
3.Loosen the light assembly retaining screws with a cross-tip screwdriver.
4.Remove the rear combination light assembly from the body of the vehicle.
5.Remove the socket from the assembly by turning the socket counterclockwise until the tabs on the socket align with the slots on the assembly.
6.Remove the bulb from the socket by pressing it in and rotating it counterclockwise until the tabs on the bulb align with the slots in the socket. Pull the bulb out of the socket.
7.Insert a new bulb by inserting it into the socket and rotating it until it locks into place.
8.Install the socket in the assembly by aligning the tabs on the socket with the slots in the assembly.
Push the socket into the assembly and turn the socket clockwise.
9.Reinstall the light assembly to the body of the vehicle.
Inside light
Back-up light/tail light
- ŌĆó 4 door
1.Turn off the engine.
2.Open the trunk.
3.Loosen the retaining screw of the trunk lid cover and then remove the cover.
4.Remove the socket from the assembly by turning the socket counter clockwise until the tabs on the socket align with the slots on the assembly.
5.Remove the bulb from the socket by pressing it in and rotating it until the tabs on the bulb align with the slots in the socket. Pull the bulb out of the socket.
6.Insert a new bulb by inserting it into the socket and rotating it until it locks into place.
7.Install the socket into the assembly by aligning the tabs on the socket with the slots in the assembly.
Push the socket into the assembly and turn the socket clockwise.
8.Reinstall the trunk lid cover by pushing in the screw.

- ŌĆó 5 door
1.Turn off the engine.
2.Open the tailgate.
3.Remove the service cover.
4.Remove the socket from the assembly by turning the socket counterclockwise until the tabs on the socket align with the slots on the assembly.
5.Remove the bulb from the socket by pressing it in and rotating it counterclockwise until the tabs on the bulb align with the slots in the socket. Pull the bulb out of the socket.
6.Insert a new bulb by inserting it into the socket and rotating it until it locks into place.
7.Install the socket in the assembly by aligning the tabs on the socket with the slots in the assembly.
Push the socket into the assembly and turn the socket clockwise.
8.Install the service cover by putting it into the service hole.
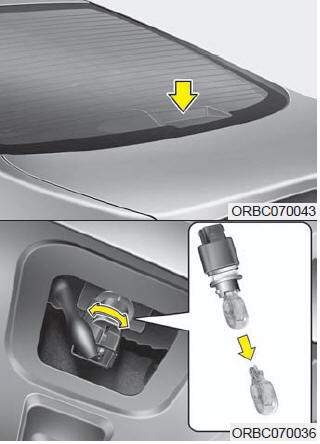
High mounted stop light replacement
- ŌĆó 4 door
1.Turn off the engine
2.Open the trunk
3.Remove the socket from the assembly by turning the socket counter clockwise until the tabs on the socket align with the slots on the assembly.
4.Remove the bulb by pulling it straight out.
5.Insert a new bulb in the socket.
6.Reinstall the socket in the assembly in the reverse order of removal.
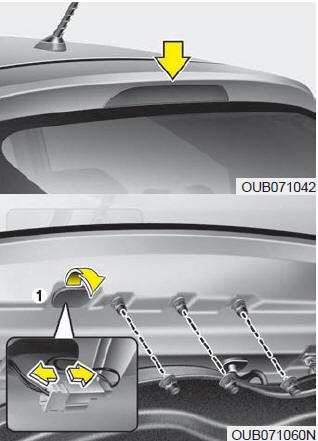
- ŌĆó 5 door
1.Turn off the engine
2.Open the tailgate.
3.Gently remove the rubber cover (1).
4.Disconnect the electrical connector.
5.Loosen the retaining nuts.
6.Remove the washer hose socket from the lamp assembly by turning the socket counter clockwise until the tabs on the socket align with the slots on the assembly.
7.Reinstall a new light assembly in the reverse order of removal.
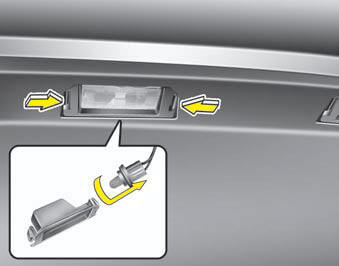
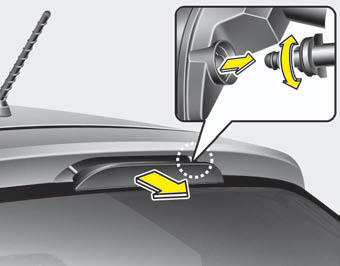
License plate light bulb replacement
1.Remove the lens by pressing the tabs.
2.Remove the socket from the lens.
3.Remove the bulb by pulling it straight out.
4.Install a new bulb in the socket and install the socket to the lens.
5.Reinstall the lens securely.
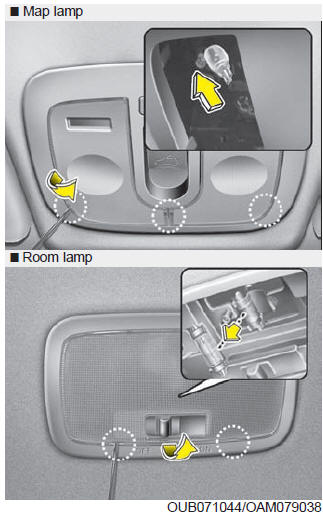
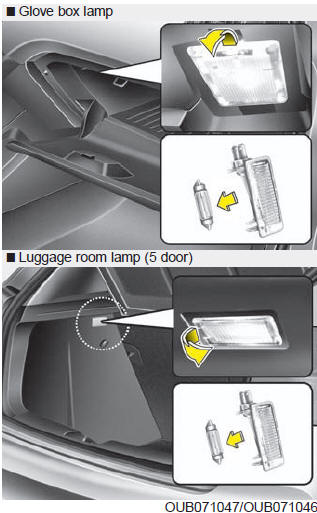
Interior light bulb replacement
1.Using a flat-blade screwdriver, gently pry the lens from the interior light housing.
2.Remove the bulb by pulling it straight out.
WARNING - Interior lights
Prior to working on the Interior Lights, ensure that the ŌĆ£OFFŌĆØ button is pressed to avoid burning your fingers or receiving an electric shock.
3.Install a new bulb in the socket.
4.Align the lens tabs with the interior light housing notches and snap the lens into place.
 Fuses
Fuses
A vehicleŌĆÖs electrical system is protected from electrical overload damage by
fuses.
This vehicle has 2 fuse panels, one located in the driverŌĆÖs side panel bolster,
the other in the engine ...
 Appearance care
Exterior care
Exterior general caution
It is very important to follow the label directions when using any chemical cleaner
or polish. Read all warning and caution statements that appear on the lab ...
See also:
Torque Converter Control Solenoid Valve (T/CON_VFS) Installation
1.
Installation is the reverse of removal.
ŌĆó
...
Front Stabilizer Bar Replacement
1.
Remove the front wheel & tire.
Tightening torque :
88.3 ~ 107.9N.m(9.0 ~ 11.0kgf.m, 65.1 ~ 79.6lb-ft)
...
Anchor Pretensioner (APT) Installation
1.
Remove ignition key from the vehicle.
2.
Disconnect the negative (-) cable from battery and wait for at
least thirty seconds.
...
Categories
- Kia Rio Manuals Home
- Kia Rio YB 2017-2026 Owners Manual
- Kia Rio YB 2017-2026 Service Manual
- Kia Rio UB 2012-2017 Owners Manual
- Kia Rio UB 2012-2017 Service Manual
- Downloads
