 Kia Rio: Exhaust Manifold: Removal and Installation
| 1. |
Remove the engine cover.
|
| 2. |
Disconnect the battery negative terminal.
|
| 3. |
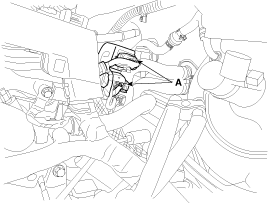
Disconnect the front and rear oxygen sensor connectors (A).
|
| 4. |
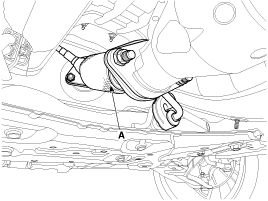
Remove the front muffler (A).
|
| 5. |
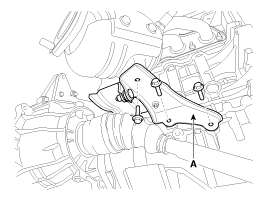
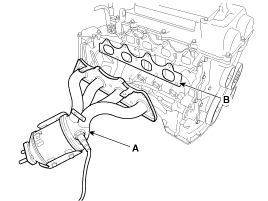
Remove the exhaust manifold stay (A).
|
| 6. |
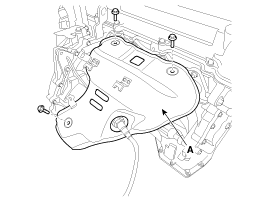
Remove the heat protector (A).
|
| 7. |
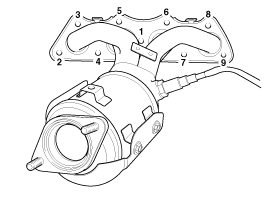
Remove the exhaust manifold (A).
|

| 8. |
Installation is reverse order of removal.
|
 Exhaust Manifold: Components
1. Heat protector
2. Exhaust manifold
3. Exhaust manifold gasket
4. Exhaust manifold stay
...
 Muffler: Components
1. Front muffler
2. Catalytic converter & Center muffler assembly
3. Main muffler
4. Gasket
5. Hanger
...
See also:
Overhead Console Lamp Removal
1.
Disconnect the negative (-) battery terminal.
2.
Remove the overhead console lamp lens (B).
3.
After ...
Tire and wheels
Tire care
For proper maintenance, safety, and maximum fuel economy, you must always maintain
recommended tire inflation pressures and stay within the load limits and weight
distribution recommend ...
Removal
1.
Disconnect the battery negative terminal.
2.
Disconnect the air compressor connector (A) and the alternator
connector (B), and remove th ...
Categories
- Kia Rio Manuals Home
- Kia Rio YB 2017-2026 Owners Manual
- Kia Rio YB 2017-2026 Service Manual
- Kia Rio UB 2012-2017 Owners Manual
- Kia Rio UB 2012-2017 Service Manual
- Downloads

Copyright ® www.kirmanual.com 2014-2026