 Kia Rio: Instrument cluster
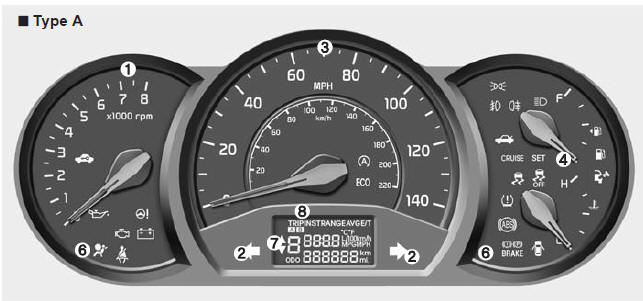
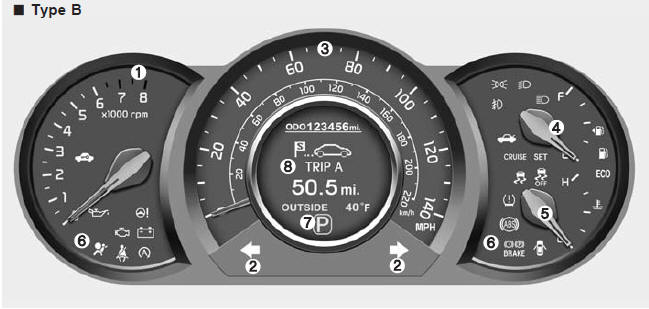
1. Tachometer
2. Turn signal indicators
3. Speedometer
4. Fuel gauge
5. Engine coolant temperature gauge
6.Warning and indicator lights
7. Shift position indicator (A/T) or Manual transaxle shift indicator (M/T)
8. Odometer/Trip computer

Instrument panel illumination
When the vehicleŌĆÖs parking lights or headlights are on, push upward or downward the illumination control knob to adjust the brightness of the instrument panel illumination.
The brightness of the instrument panel (Type B) illumination can be adjusted by rotating the control knob when the ignition switch is in ON position.

Gauges
Speedometer
The speedometer indicates the forward speed of the vehicle.
The speedometer is calibrated in miles per hour and/or kilometers per hour.
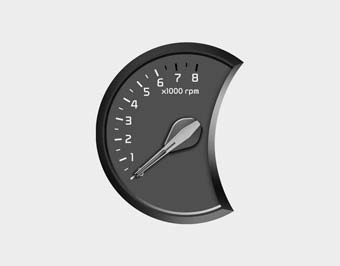
Tachometer
The tachometer indicates the approximate number of engine revolutions per minute (rpm).
Use the tachometer to select the correct shift points and to prevent lugging and/or over-revving the engine.
The tachometer pointer may move slightly when the ignition switch is in ACC or ON position with the engine OFF. This movement is normal and will not affect the accuracy of the tachometer once the engine is running.
CAUTION - Red zone
Do not operate the engine within the tachometer's RED ZONE. This may cause severe engine damage.
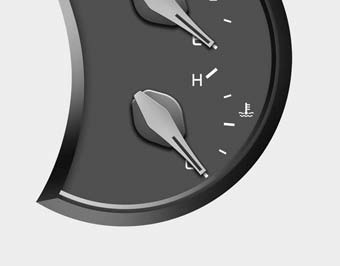
Engine coolant temperature gauge
This gauge shows the temperature of the engine coolant when the ignition switch is ON.
Do not continue driving with an overheated engine. If your vehicle overheats, refer to ŌĆ£If the engine overheatsŌĆØ in section 6.
If the gauge pointer moves beyond the normal range area toward the ŌĆ£HŌĆØ position, it indicates overheating that may damage the engine.
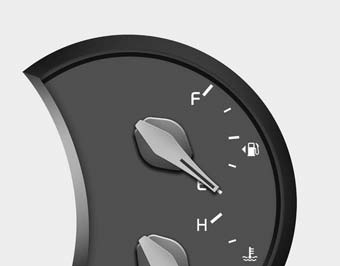
Fuel gauge
The fuel gauge indicates the approximate amount of fuel remaining in the fuel tank. The fuel tank capacity is given in section 8. The fuel gauge is supplemented by a low fuel warning light, which will illuminate when the fuel tank is nearly empty.
On inclines or curves, the fuel gauge pointer may fluctuate or the low fuel warning light may come on earlier than usual due to the movement of fuel in the tank.
WARNING - Fuel gauge
Stop and obtain additional fuel as soon as possible after the warning light comes on or when the gauge indicator comes close to the E level. Running out of fuel can expose vehicle occupants to danger.
CAUTION - Low fuel
Avoid driving with extremely low fuel level. Running out of fuel could cause the engine to misfire, damaging the catalytic converter.
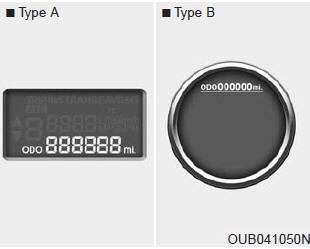
Odometer
The odometer indicates the total distance the vehicle has been driven.
You will also find the odometer useful to determine when periodic maintenance should be performed.
✽ NOTICE
It is against the law to alter the odometer on all vehicles with the intent to change the mileage registered on the odometer.

Trip computer (Tripmeter) (if equipped)
The trip computer is a microcomputer- controlled driver information system that displays information related to driving, when the ignition switch is in the ON position.
All stored driving information (except distance to empty and instant fuel consumption) will reset if the battery is disconnected.
Cluster Type A

Cluster Type B
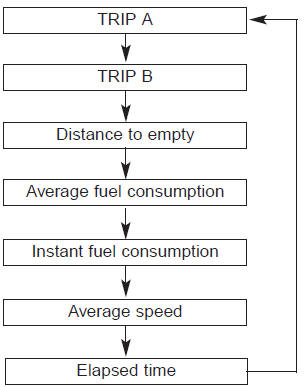
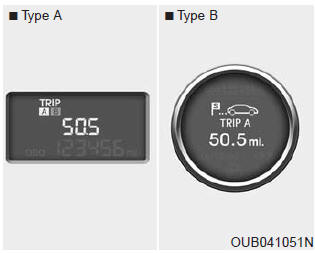
Tripmeter
TRIP A: Tripmeter A
TRIP B: Tripmeter B
This mode indicates the distance of individual trips selected since the last tripmeter reset.
The meter's working range is from 0.0 to 999.9 miles (0.0 to 999.9 km). Pressing the TRIP button for more than 1 second, when the tripmeter (TRIP A or TRIP B) is being displayed, clears the tripmeter to zero (0.0).
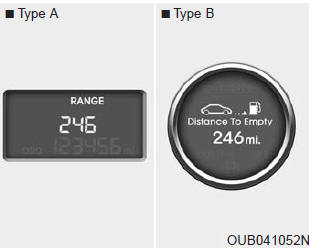
Distance to empty
This mode indicates the estimated distance to empty based on the current fuel in the fuel tank and the amount of fuel delivered to the engine. When the remaining distance is below 30 miles (50 km), ŌĆ£---ŌĆØ will be displayed and the distance to empty indicator will blink.
The meterŌĆÖs working range is from 30 to 990 miles (50 to 999 km).
- If the vehicle is not on level ground or the battery power has been interrupted, the ŌĆ£Distance to emptyŌĆØ function may not operate correctly. The trip computer may not register additional fuel if less than 6 liters (1.6 gallons) of fuel are added to the vehicle.
- The fuel consumption and distance to empty values may vary significantly based on driving conditions, driving habits, and condition of the vehicle.
- The distance to empty value is an estimate of the available driving distance. This value may differ from the actual driving distance available.
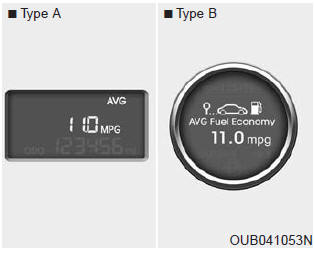
Average fuel consumption
This mode calculates the average fuel consumption from the total fuel used and the distance since the last average consumption reset. The total fuel used is calculated from the fuel consumption input. For an accurate calculation, drive more than 0.03 mile (50 m).
Pressing the TRIP button for more than 1 second, when the average fuel consumption is displayed, clears the average fuel consumption to zero (---).
If the vehicle speed exceeds 0.6 MPH (1 km/h) after refueled more than 6 l, the average fuel consumption will be cleared to zero (---).
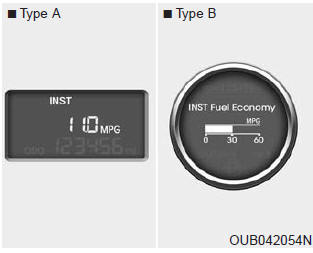
Instant fuel consumption
This mode calculates the instant fuel consumption during the last few seconds.
✽ NOTICE
You must drive more than 6 MPH (10 km/h) (type A) or 3 MPH (5 km/h) (type B) for this mode to calculate the instant fuel consumption.
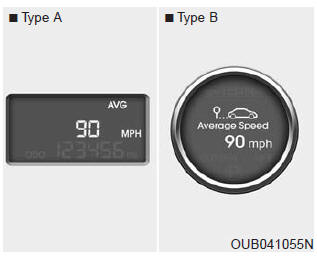
Average speed
This mode calculates the average speed of the vehicle since the last average speed reset.
Even if the vehicle is not in motion, the average speed keeps going while the engine is running.
Pressing the TRIP button for more than 1 second, when the average speed is displayed, clears the average speed to zero (---).
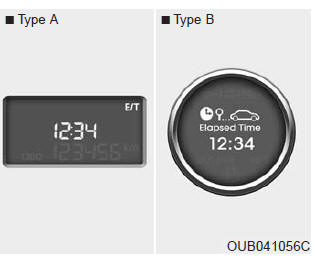
Driving time
This mode indicates the total time traveled since the last driving time reset.
Even if the vehicle is not in motion, the driving time keeps going while the engine is running.
The meterŌĆÖs working range is from 0:00~99:59.
Pressing the TRIP button for more than 1 second, when the driving time is being displayed, clears the driving time to zero (0:00).
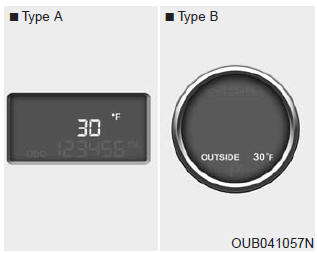
Outside temperature (if equipped)
This mode indicates the outside temperature around the vehicle.
The meter's working range is from - 40┬░C to 60┬░C (-40┬░F to 140┬░F).
Type A
To change the outside temperature display unit (┬░C ↔ ┬░F), press the RESET button more than 1 second in this mode.
Type B
To Change the outside temperature display unit (┬░C ↔ ┬░F), see the following pages in Vehicle Option section.
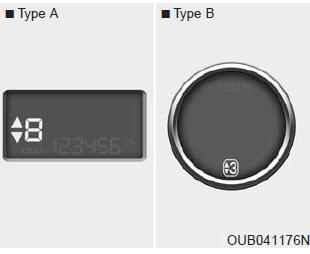
Manual transaxle shift indicator (if equipped)
This indicator informs you which gear is desired while driving to save fuel.
For example
 : Indicates
that shifting up to the 3rd gear is desired (currently the shift lever is in the
2nd or 1st gear).
 : Indicates
that shifting down to the 3rd gear is desired (currently the shift lever is in the
4th or 5th gear).
When the system is not working properly, the indicator is not displayed.
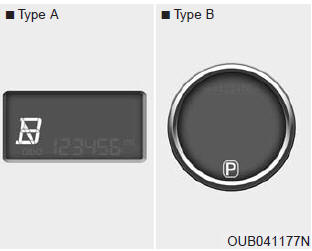
Automatic transaxle shift position indicator (if equipped)
The indicator displays which automatic transaxle shift lever is selected.
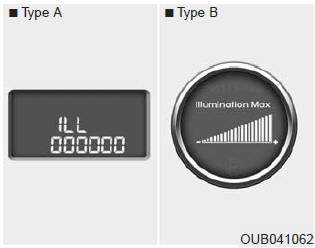
Illumination intensity
The illumination intensity of the instrument panel is shown when adjusting it with the illumination control switch.
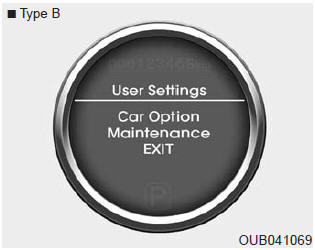
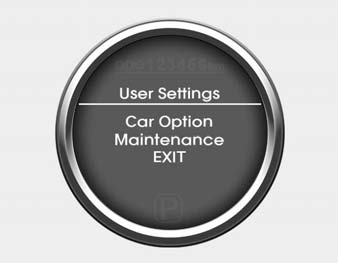
User Settings (only for Type B cluster, if equipped)
1.Stop the vehicle with the ignition switch in the ON position or engine running.
2.Press the TRIP button until the User setting is displayed.
3.With the User setting displayed, press the TRIP button for 2 seconds.
4.You can change the item by pressing the TRIP button and select an item by pressing the RESET button.
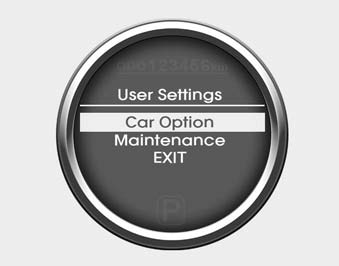
Car option (only for Type B cluster, if equipped)
1.When the vehicle is at a standstill, pressing the TRIP button for more than 2 seconds with the ENGINE START/STOP button in the ON position or engine running, the LCD display on the cluster will change to the "User Setting" mode.
You can move to items by pressing the TRIP button and select the item by pressing the RESET button.
2.In the "User Setting" mode, select "Vehicle Option".
3.Move (TRIP button) to the desired item and select (RESET button).
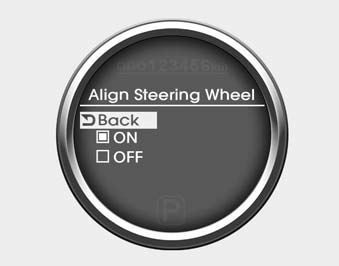
Align steering wheel (Steering position) (if equipped)
On - The warning illuminates on the LCD display when the steering wheel is not aligned with the ENGINE START/STOP button in the ON position.
Off - The warning does not illuminate on the LCD display when the steering wheel is not aligned with the ENGINE START/STOP button in the ON position.
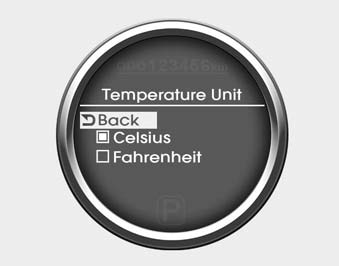
Outside temperature unit (if equipped)
You can exchange the outside temperature unit ┬░C ↔ ┬░F.
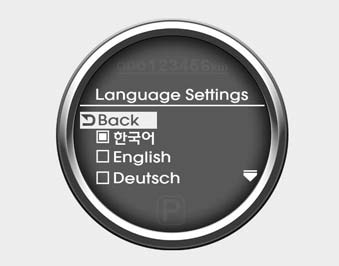
Language
Choose a language you prefer within the LCD display.
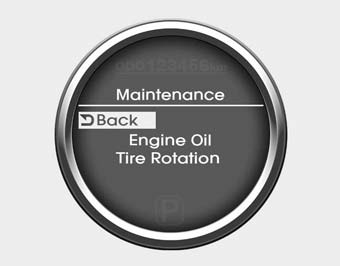
Maintenance system (only for Type B cluster, if equipped)
The Maintenance system informs the driver when to replace engine oil and rotate tires.
Maintenance
1.When the vehicle is at a standstill, pressing the TRIP button for more than 2 seconds with the ENGINE START/ STOP button in the ON position or engine running, the LCD display on the cluster will change to the "User Setting" mode.
You can move to the items by pressing the TRIP button and select the item by pressing the RESET button.
2.In the "User Setting" mode select "Maintenance".
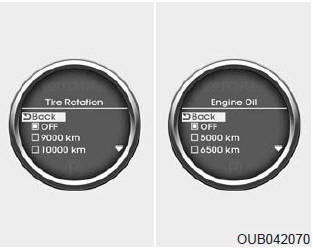
Maintenance schedule
1.Select the desired engine oil (tire rotation) maintenance schedule.
2.If finished, you can come out of the Maintenance mode by pressing the TRIP button for more than 2 seconds.
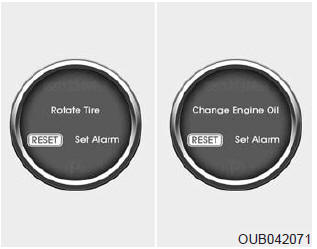
Engine Oil(Tire Rotation) Service Required
1.If service is required, the message will be displayed.
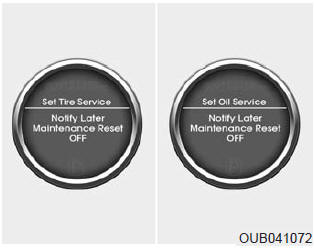
2.If you would like to reset or inactivate the maintenance system press the RESET button for more than 1 second. The display will change to "Engine Oil Service Message" mode.
You can move to items by pressing the TRIP button and select the desired item by pressing the RESET button.
- Warnings and indicators
- Low brake fluid level warning
- LCD display warning (if equipped)
- Rear-camera display
- Hazard warning flasher lighting
 Inside rearview mirror
Adjust the rearview mirror so that the center view through the rear window is
seen. Make this adjustment before you start driving.
Do not place objects in the rear seat which would interfere with y ...
 Warnings and indicators
All warning lights are checked by turning the ignition switch ON (do not start
the engine). Any light that does not illuminate should be checked by an authorized
Kia dealer.
After starting the en ...
See also:
LCD display warning (if equipped)
For vehicleŌĆÖs equipped with smart key system
Key is not in vehicle
If the smart key is not in the vehicle and if any door is opened or closed with
the engine start/stop button in the ACC, ON, ...
Seat Belt Buckle Switch (BS) Removal
1.
Disconnect the battery negative cable, and wait for at least three
minutes before beginning work.
2.
Remove the front seat assembly.
...
Categories
- Kia Rio Manuals Home
- Kia Rio YB 2017-2026 Owners Manual
- Kia Rio YB 2017-2026 Service Manual
- Kia Rio UB 2012-2017 Owners Manual
- Kia Rio UB 2012-2017 Service Manual
- Downloads
