 Kia Rio: Body Side Moulding Replacement
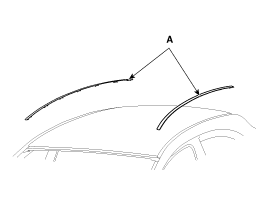
Roof Garnish Replacement
| ŌĆó
|
When prying with a flat-tip screwdriver, wrap it with
protective tape, and apply protective tape around the related
parts, to prevent damage.
|
| ŌĆó
|
Put on gloves to protect your hands.
|
| ŌĆó
|
Take care not to scratch the body surface.
|
|
|
1. |
Using a screwdriver or remover, remove the roof garnish (A).
|
|
2. |
Installation is the reverse of removal.
|
ŌĆó |
Replace any damaged clips.
|
|
|
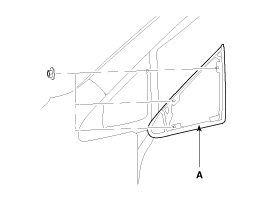
Delta Glass Replacement
| ŌĆó
|
When prying with a flat-tip screwdriver, wrap it with
protective tape, and apply protective tape around the related
parts, to prevent damage.
|
| ŌĆó
|
Put on gloves to protect your hands.
|
| ŌĆó
|
Take care not to scratch the body surface.
|
|
|
1. |
Remove the following items :
| A. |
Front pillar trim
(Refer to the BD group - "Interior Trim")
|
|
|
2. |
After loosening the mounting nuts, then remove the delta glass
(A).
Tightening torque :
3.9 ~ 4.4 N.m (0.4 ~ 0.45 kgf.m, 2.9 ~ 3.3 lb-ft)
|
|
|
3. |
Installation is the reverse of removal.
|
ŌĆó |
Replace any damaged clips.
|
|
|
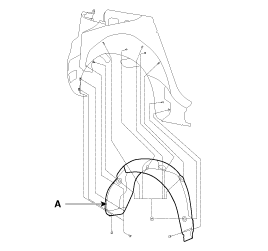
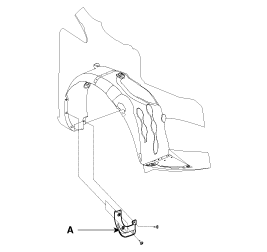
Front Wheel Guard Replacement
| ŌĆó
|
When prying with a flat-tip screwdriver, wrap it with
protective tape, and apply protective tape around the related
parts, to prevent damage.
|
| ŌĆó
|
Put on gloves to protect your hands.
|
| ŌĆó
|
Take care not to scratch the body surface.
|
|
|
1. |
Remove the front tire.
|
|
2. |
After loosening the mounting screws and clips, then remove the
front wheel guard (A).

|
|
3. |
Installation is the reverse of removal.
|
ŌĆó |
Replace any damaged clips.
|
|
|
Rear Wheel Guard Replacement
| ŌĆó
|
When prying with a flat-tip screwdriver, wrap it with
protective tape, and apply protective tape around the related
parts, to prevent damage.
|
| ŌĆó
|
Put on gloves to protect your hands.
|
| ŌĆó
|
Take care not to scratch the body surface.
|
|
|
2. |
After loosening the mounting clips and screws, then remove the
rear wheel guard (A).
[A Type]
[B Type]
|
|
3. |
Installation is the reverse of removal.
|
ŌĆó |
Replace any damaged clips.
|
|
|
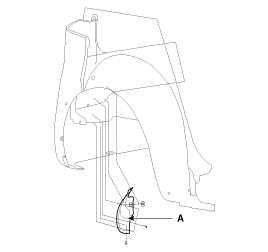
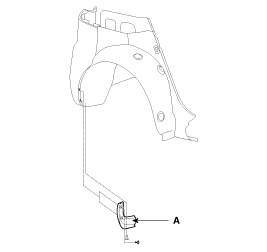
Front Mud Guard Replacement
| ŌĆó
|
When prying with a flat-tip screwdriver, wrap it with
protective tape, and apply protective tape around the related
parts, to prevent damage.
|
| ŌĆó
|
Put on gloves to protect your hands.
|
| ŌĆó
|
Take care not to scratch the body surface.
|
|
|
1. |
After loosening the mounting clip and screws, then remove the
front mud guard (A).
|
|
2. |
Installation is the reverse of removal.
|
ŌĆó |
Replace any damaged clips.
|
|
|
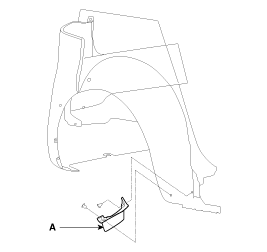
Rear Mud Guard Replacement
| ŌĆó
|
When prying with a flat-tip screwdriver, wrap it with
protective tape, and apply protective tape around the related
parts, to prevent damage.
|
| ŌĆó
|
Put on gloves to protect your hands.
|
| ŌĆó
|
Take care not to scratch the body surface.
|
|
|
1. |
After loosening the mounting clip and screws, then remove the
rear mud guard (A).
|
|
2. |
Installation is the reverse of removal.
|
ŌĆó |
Replace any damaged clips.
|
|
|
Rear Wheel Deflector Replacement
| ŌĆó
|
When prying with a flat-tip screwdriver, wrap it with
protective tape, and apply protective tape around the related
parts, to prevent damage.
|
| ŌĆó
|
Put on gloves to protect your hands.
|
| ŌĆó
|
Take care not to scratch the body surface.
|
|
|
1. |
After loosening the mounting clips, then remove the rear wheel
deflector (A).
|
|
2. |
Installation is the reverse of removal.
|
ŌĆó |
Replace any damaged clips.
|
|
|
Glass Adjustment
ŌĆó
Check the glass run channel for damage or deterioration,
and re ...
1 . Glass panel assembly
2 . Glass panel
3 . Reinforcement glass
4 . Encapsulated glass panel
5 . Wind deflector net assembly
6 . Wind deflector beam
7 . Plate cover [RH] ...
See also:
Rear Wheel Alignment
When using a commercially available computerized wheel alignment
equipment to inspect the rear wheel alignment, always p ...
Antenna Removal
1.
Remove the rear roof trim.
(Refer to the Body group - Roof trim).
2.
Disconnect the antenna cable and the connector (A).
...
Description
The Alternator has eight built-in diodes, each rectifying AC current to
DC current.
Therefore, DC current appears at alternator "B" terminal.
In addition, the charging voltage ...


 Rear Door Adjustment
 Sunroof Components