 Kia Rio: TJ Joint Installation
| 1. |
Wrap tape around the driveshaft spline(TJ) to prevent damage to
the boot.
|
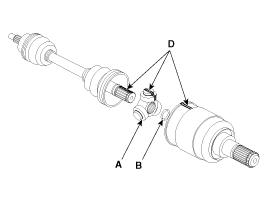
| 2. |
Using the alignment marks (D) made during disassembly as a guide,
install the spider assembly (A) and snap ring (B) on the driveshaft
splines (C).
|

| 3. |
Add specified grease to the joint boot as much as it was wiped
away at inspection.
|
| 4. |
Install the both boot band.
|
| 5. |
To control the air in the TJ boot, keep the specified distance
between the boot bands when they are tightened.
|
|||||||||||
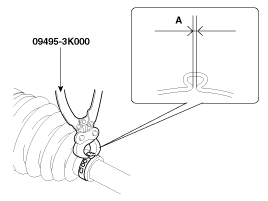
| 6. |
Using the SST(09495-3K000), secure the TJ boot bands.
|
| 7. |
Install the Front Driveshaft. (Refer to DS group - ŌĆ£Front DriveshaftŌĆØ)
|
 TJ Joint Inspection
1.
Check the spider assembly for roller rotation, wear or corrosion.
2.
Check the groove inside the joint case for wear or corrosion
...
 Dynamic Damper Components
1. BJ assembly
2. Circlip
3. BJ boot band
4. BJ boot
5. Dynamic damper band
6. Dynamic damper
7. Shaft
8. TJ boot band
9. TJ boot
10. Spider assembly
1 ...
See also:
Auto Light Sensor Installation
1.
Reconnect the auto light connector.
2.
Install the auto light sensor.
...
Installation
1.
Install in the reverse order of removal.
2.
Adjust the alternator belt tension after installation.
(Refer to Engine charging Sy ...
Component Location
1. Instrument cluster assembly
2. Seat belt switch
3. Vehicle speed sensor
4. Engine coolant temperature sender
5. Oil pressure switch
6. Brake fluid level warning switch
...
Categories
- Kia Rio Manuals Home
- Kia Rio YB 2017-2026 Owners Manual
- Kia Rio YB 2017-2026 Service Manual
- Kia Rio UB 2012-2017 Owners Manual
- Kia Rio UB 2012-2017 Service Manual
- Downloads

Copyright ® www.kirmanual.com 2014-2026