 Kia Rio: Valve Clearance Inspection And Adjustment
|
Inspect and adjust the valve clearance when the engine is cold
(Engine coolant temperature : 20┬░C) and cylinder head is installed on
the cylinder block.
|
|
1. |
Remove the cylinder head cover. (Refer to Timing system)
|
|
2. |
Set No.1 cylinder to top dead center (TDC)/compression.
|
(1) |
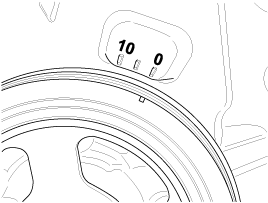
Turn the crankshaft pulley and align its groove with the
timing mark of the timing chain cover.
|
|
(2) |
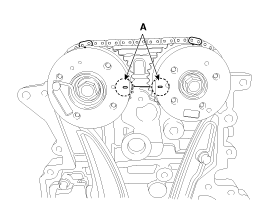
Check that the marks of the intake and exhaust Continuous
variable valve timing (CVVT) sprockets are in straight line
on the cylinder head surface as shown in the illustration. If
not, turn the crankshaft one revolution (360┬░).
|
|
|
3. |
Inspect the valve clearance.
|
(1) |
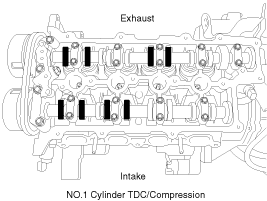
Check only the intake valves of the 1st and 2nd cylinders
and exhaust valves of the 1st and 3rd cylinders for their clearance.
| A. |
Using a thickness gauge, measure the clearance
between the tappet and the base circle of camshaft.
|
| B. |
Record the out-of-specification valve clearance
measurements. They will be used later to determine the
required tappet for adjusting.
|
Valve clearance (Engine
coolant temperature : 20┬░C)
[Specification]
Intake : 0.17 ~ 0.23mm (0.0067 ~ 0.0091in.)
Exhaust : 0.22 ~ 0.28mm (0.0087 ~ 0.0110in.)
|
|
|
(2) |
Turn the crankshaft pulley one revolution (clockwise 360┬░)
and align its groove with timing mark of the timing chain cover.
|
|
(3) |
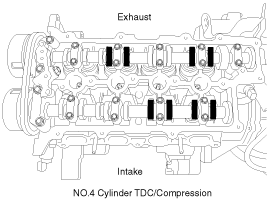
Check the intake valves of the 3rd and 4th cylinders and
exhaust valves of the 2nd and 4th cylinders for their clearance.
|
|
|
4. |
Adjust the intake and exhaust valve clearance.
|
(1) |
Set the No.1 cylinder to the top dead center (TDC)/compression
position.
|
|
(2) |
Remove the timing chain. (Refer to Timing system)
|
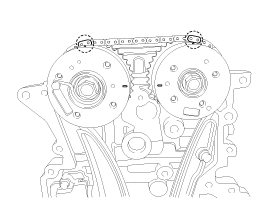
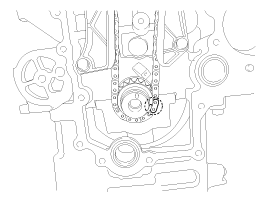
Put paint marks on the timing chain links (2 places)
that meet with the timing marks of the intake and exhaust
CVVT sprockets.
|
|
|
(3) |
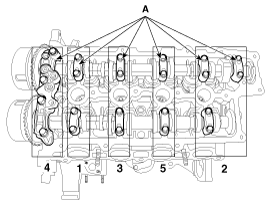
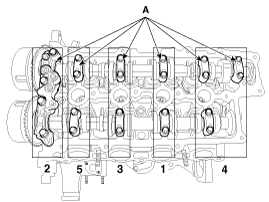
Remove the camshaft bearing caps (A) with the order below.
|
|
(4) |
Remove the intake camshaft assembly.
|
|
(5) |
Remove the exhaust camshaft assembly.
|
|
(6) |
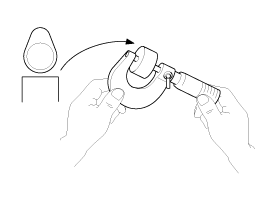
Measure the thickness of the removed tappet using a micrometer.
|
|
(7) |
Calculate the thickness of a new tappet so that the valve
clearance comes within the specificified value.
Valve clearance (Engine coolant temperature :
20┬░C)
T : Thickness of removed tappet
A : Measured valve clearance
N : Thickness of new tappet
Intake : N = T + [A - 0.20mm(0.0079in.)]
Exhaust : N = T + [A - 0.25mm (0.0098in.)]
|
|
|
(8) |
Select a new tappet with a thickness as close as possible
to the calculated value.
|
Shims are available in 41 size increments of 0.015mm
(0.0006in.) from 3.00mm (0.118in.) to 3.690mm (0.1417in.)
|
|
|
(9) |
Place a new tappet on the cylinder head.
|
|
(10) |
Install the exhaust camshaft assembly.
|
|
(11) |
Install the intake camshaft assembly.
|
|
(12) |
Install the camshaft bearing caps with the order below.
Tightening torque
1st step
M6 bolt :
5.9 N.m (0.6 kgf.m, 4.3 lb-ft)
M8 bolt :
9.8 N.m (1.0 kgf.m, 7.2 lb-ft)
2nd step
M6 bolts :
11.8 ~ 13.7N.m (1.2 ~ 1.4kgf.m, 8.7 ~ 10.1lb-ft)
M8 bolts :
18.6 ~ 22.6N.m (1.9 ~ 2.3kgf.m, 13.7 ~ 16.6lb-ft)
|
|
|
(13) |
Install the timing chain. (Refer to Timing system)
|
|
(14) |
Turn the crankshaft two turns in the operating direction(clockwise)
and check that the marks of the intake and exhaust continous
variable vavle timing (CVVT) sprockets are in straight line
on the cylinder head surface.

|
|
(15) |
Recheck the valve clearance.
Valve clearance (Engine
coolant temperature : 20┬░C)
[Specification]
Intake : 0.17 ~ 0.23mm (0.0067 ~ 0.0091in.)
Exhaust : 0.22 ~ 0.28mm (0.0087 ~ 0.0110in.)
|
|
|
See also:
Starter: Description
The starting system includes the battery, starter, solenoid switch, ignition
switch, inhibitor switch (A/T), clutch pedal switch (M/T), ignition lock switch,
connection wires and the battery ...
Spark Plug: Inspection
[On vehicle inspection]
1.
Accelerate the engine to about 3,000 rpm 3 times or more.
2.
Remove the spark plug.
...
Ignition Coil: Description
An ignition coil is an induction coil in an engine's ignition system which
transforms the battery's low voltage to the high voltage needed to create an
electric spark in the spark plu ...
 Kia Rio: Valve Clearance Inspection And Adjustment
 CVVT & Camshaft


