 Kia Rio: Inside rearview mirror
Adjust the rearview mirror so that the center view through the rear window is seen. Make this adjustment before you start driving.
Do not place objects in the rear seat which would interfere with your vision through the rear window.
WARNING - Mirror adjustment
Do not adjust the rearview mirror while the vehicle is moving. This could result in loss of control.
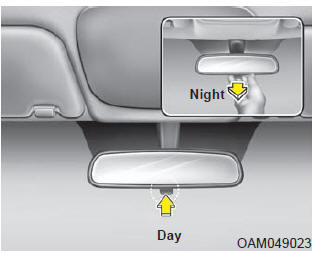
Day/night rearview mirror (if equipped)
Make this adjustment before you start driving and while the day/night lever is in the day position.
Pull the day/night lever toward you to reduce the glare from the headlights of the vehicles behind you during night driving.
Remember that you lose some rearview clarity in the night position.
Outside rearview mirror
Be sure to adjust the mirror angles before driving.
Your vehicle is equipped with both left-hand and right-hand outside rearview mirrors. The mirrors can be adjusted remotely with the remote switch (if equipped). The mirror heads can be folded to prevent damage during an automatic car wash or when passing through a narrow street.
The right outside rearview mirror is convex. Objects seen in the mirror are closer than they appear.
Use your interior rearview mirror or direct observation to determine the actual distance of following vehicles when changing lanes.
CAUTION - Rearview mirror
Do not scrape ice off the mirror face; this may damage the surface of the glass. If ice should restrict movement of the mirror, do not force the mirror for adjustment. To remove ice, use a deicer spray, or a sponge or soft cloth with very warm water.
WARNING - Mirror adjustment
Do not adjust or fold the outside rearview mirrors while the vehicle is moving. This could result in loss of control.
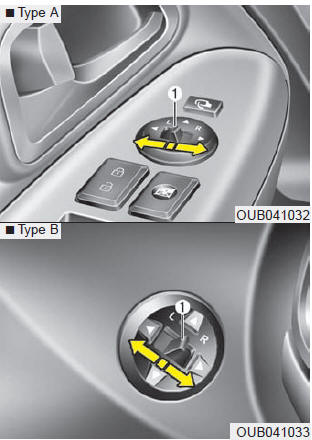
Remote control
Electric type
The electric remote control mirror switch allows you to adjust the position of the left and right outside rearview mirrors. To adjust the position of either mirror the ignition switch should be in the ACC or ON position.
Move the lever (1) to R or L to select the right side mirror or the left side mirror, then press a corresponding point on the mirror adjustment control to position the selected mirror up, down, left or right.
After the adjustment, put the lever into neutral (center) position to pre- vent inadvertent adjustment.
CAUTION - Outside mirror
- The mirrors stop moving when they reach the maximum adjusting angles, but the motor continues to operate while the switch is pressed. Do not press the switch longer than necessary, the motor may be damaged.
- Do not attempt to adjust the outside rearview mirror by hand. Doing so may damage the related parts.
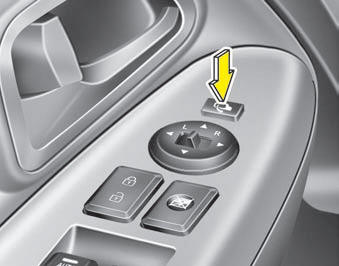
Folding the outside rearview mirror
Electric Type (if equipped)
To fold the outside rearview mirror, depress the button.
To unfold it, depress the button again.
CAUTION - Electric type outside rearview mirror
The electric type outside rearview mirror operates even though the ignition switch is in the OFF position. However, to prevent unnecessary battery discharge, do not adjust the mirrors longer than necessary while the engine is not running. In case it is an electric type outside rearview mirror, donŌĆÖt fold it by hand. It could cause motor failure.
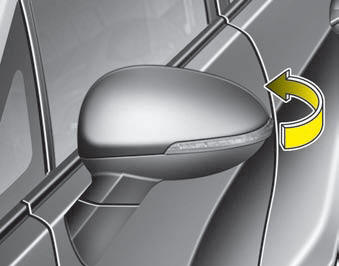
Manual type
To fold outside rearview mirror, grasp the housing of mirror and then fold it toward the rear of the vehicle.
 Mirrors
...
 Instrument cluster
1. Tachometer
2. Turn signal indicators
3. Speedometer
4. Fuel gauge
5. Engine coolant temperature gauge
6.Warning and indicator lights
7. Shift position indicator (A/T) or Manual tr ...
See also:
Teaching Procedures
1.
Key Teaching Procedure
Key teaching must be done after replacing a defective ECM or when
providing additional keys to the vehicle owner.
The procedure st ...
ECM Terminal And Input/Output signal [A/T]
ECM Terminal Function (A/T)
Connector [EGGA-AG]
Pin No.
Description
Connected to
1
Injector (Cylinder #1) [High] control output
...
Warning / Caution Label Locations
1. Fan caution
2. Radiator cap caution
3. Battery caution
...
Categories
- Kia Rio Manuals Home
- Kia Rio YB 2017-2026 Owners Manual
- Kia Rio YB 2017-2026 Service Manual
- Kia Rio UB 2012-2017 Owners Manual
- Kia Rio UB 2012-2017 Service Manual
- Downloads
