 Kia Rio: Front Seat Replacement
| ŌĆó
|
When removing or installing the front passenger seat,
be sure to initialize the Weight Classification System(WCS)
(If initialization process is not performed, WCS may not
be able to detect a person correctly.)
(Refer to Restraint - "Weight Classification System (WCS)")
|
| ŌĆó
|
When replacing the WCS, be sure to check the parts unit.
|
| -
|
Parts unit of WCS : seat track assembly
|
|
Front Seat Assembly Replacement
|
1. |
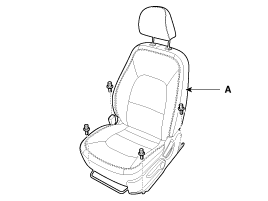
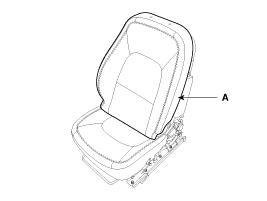
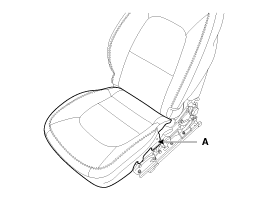
After loosening the front seat assembly mounting bolts, remove
the front seat assembly (A).
Tightening torque :
49.0 ~ 63.7 N.m (5.0 ~ 6.5 kgf.m, 36.2 ~ 47.0 lb-ft)
|
|
|
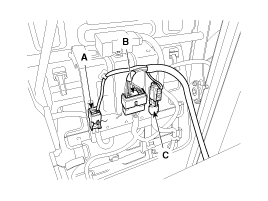
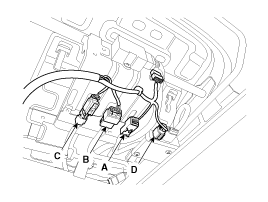
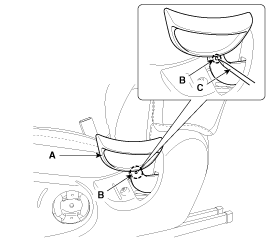
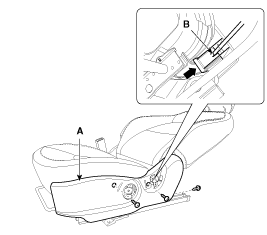
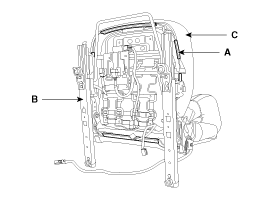
2. |
Disconnect the seat buckle connector (A), seat warmer connector
(B), Side Airbag (SAB) connector(C), Weight Classification System (WCS)
connector (D).
[Driver's]
[Passenger's]
|
|
3. |
Installation is the reverse of removal.
|
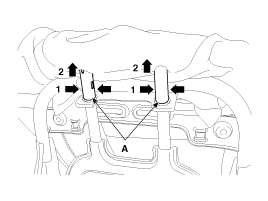
Seat Mounting Bolt Installation Procedure
|
ŌĆó |
Set the into the most rearward position. Check
then each slide is locked, and then Tighten the front
mounting bolt temporarily.
|
|
ŌĆó |
Set the seat into most forward position. Check
that each slide is locked, and then Tighten the rear
mounting bolt completely.
|
|
ŌĆó |
Set the seat into the most rearward position.
Check the front mounting bolt completely.
|
|
ŌĆó |
Check that the seat operates back and forth smoothy
and the locking portion locks properly.
|
|
|
Shield Outer Cover Replacement
| ŌĆó
|
When prying with a flat-tip screwdriver, wrap it with
protective tape, and apply protective tape around the related
parts your hands.
|
| ŌĆó
|
Put on gloves to protect your hands.
|
|
|
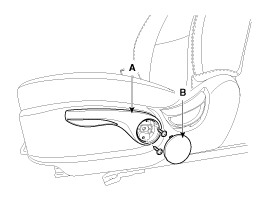
1. |
Remove the height knob cap (B).
|
|
2. |
After loosening the mounting screws, then remove the pumping lever
(A).
|
|
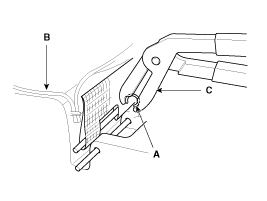
3. |
To, disengage the lock pin, pull the recliner lever (A) after
pushing lock pin hole (B) with the pointed instrument (C).
|
ŌĆó |
Be careful not to damage the lock pin.
|
|
|
|
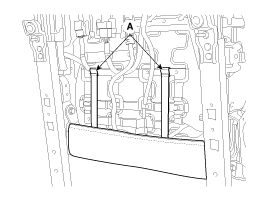
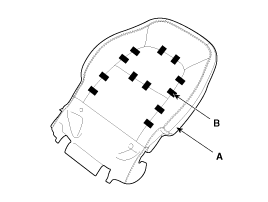
4. |
Loosen the shield outer cover mounting screws.
|
|
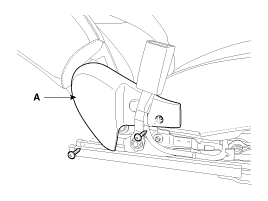
5. |
To remove the shield outer cover (A), disengage the lock pin (B)
and remove the shield outer cover (A).
|
|
6. |
Installation is the reverse of removal.
|
ŌĆó |
Replace any damaged clips.
|
|
|
Shield Inner Cover Replacement
| ŌĆó
|
When prying with a flat-tip screwdriver, wrap it with
protective tape, and apply protective tape around the related
parts your hands.
|
| ŌĆó
|
Put on gloves to protect your hands.
|
|
|
1. |
Remove the following items first.:
|
|
2. |
After loosening the mounting screws, then remove the shield inner
cover (A).
|
|
3. |
Installation is the reverse of removal.
|
ŌĆó |
Replace any damaged clips.
|
|
|
Front Seat Back Cover Replacement
| ŌĆó
|
When prying with a flat-tip screwdriver, wrap it with
protective tape, and apply protective tape around the related
parts your hands.
|
| ŌĆó
|
Put on gloves to protect your hands.
|
|
|
1. |
Remove the following items first :
|
|
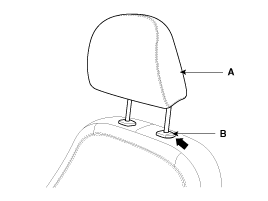
2. |
Push the lock pin (B), remove the headrest (A).
|
|
3. |
Remove the protector (A).
|
|
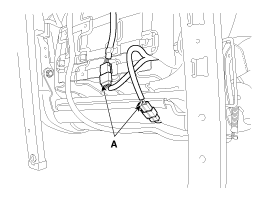
4. |
Disconnect the connectors (A).
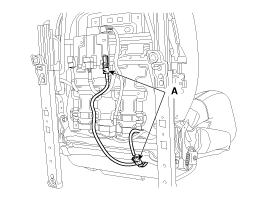
|
|
5. |
To disengage the lock pin (C), lift up the front seat back board
(A) to the arrow direction with holding the bottom place (B).
|
ŌĆó |
Be careful not to damage the lock pin.
|
|

|
|
6. |
Push the protecter (A) by the seat back frame.
|
|
7. |
Pull out the headrest guides (A) while pinching the end of the
guides, and remove them.
|
|
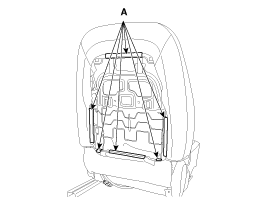
8. |
Remove the front seat back cover (A) from the frame.
|
|
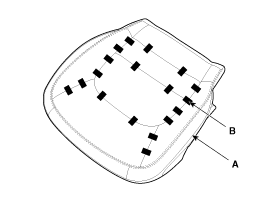
9. |
After removing the hog-ring clips (B) on the front of seat back
and remove the front seat back cover (A).
|
|
10. |
Installation is the reverse of removal.
|
ŌĆó |
To prevent wrinkles, make sure the material is
stretched evenly over the cover (B) before securing
the hog-ring clips (A).
|
|
ŌĆó |
Replace the hog-ring clips with new ones using
special tool [C (09880-4F000)].
|
|
|
Front Seat Cushion Cover Replacement
| ŌĆó
|
When prying with a flat-tip screwdriver, wrap it with
protective tape, and apply protective tape around the related
parts your hands.
|
| ŌĆó
|
Put on gloves to protect your hands.
|
|
|
1. |
Remove the following items first :
|
|
2. |
Remove the protector (A).
|
|
3. |
Disconnect the connectors (A).
|
|
4. |
Push the protecter(A), and then front seat cushion cover (C) from
the frame(B).
|
|
5. |
Remove the front seat cushion cover (A) from the frame.
|
|
6. |
After removing the hog-ring clips (B) on the front of seat cushion
and remove the front seat cushion cover (A).
|
|
7. |
Installation is the reverse of removal.
|
ŌĆó |
To prevent wrinkles, make sure the material is
stretched evenly over the cover (B) before securing
the hog-ring clips (A).
|
|
ŌĆó |
Replace the hog-ring clips with new ones using
special tool [C (09880-4F000)].
|
|
|
Front Seat Frame Replacement
| ŌĆó
|
When prying with a flat-tip screwdriver, wrap it with
protective tape, and apply protective tape around the related
parts your hands.
|
| ŌĆó
|
Put on gloves to protect your hands.
|
|
|
1. |
Remove the following items first :
| D. |
Front seat cushion cover
|
|
|
2. |
After loosening the mounting screws, then remove the shield inner
cover (A).
|
|
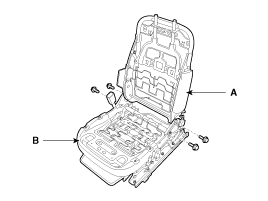
3. |
After loosening the mounting bolts, then disconnect the seat back
frame (A) and seat cushion frame (B).
Tightening torque :
49.0 ~ 63.7 N.m (5.0 ~ 6.5 kgf.m, 36.2 ~ 47.0 lb-ft)
|
|
|
4. |
Installation is the reverse of removal.
|
ŌĆó |
Remove the side air bag for replacing side air
bag installation seat.
|
|
ŌĆó |
Before service, be fully aware of precautions
and service procedure relevant to air bag.
(Refer to the group RT - Airbag)
|
|
|
1 . Headrest
2 . Headrest guide
3 . Front seat back cover
4 . Front seat back warmer
5 . Front seat back pad
6 . Front seat back silener cloth
7 . Front seat back frame as ...
[5 Door]
1. Headrest
2 . Headrest guide
3 . Webbing guide
4 . Rear latch knob
5 . Rear back knob bush
6 . Rear seat back silencer cloth
7 . Rear seat back pad ...


 Front Seat Components
 Rear Seat Components