 Kia Rio: Sunroof Adjustment
How To Initialize
| 1. |
Check that the glass has been installed.
|
| 2. |
Push the close switch. (Keep on pushing the switch)
|
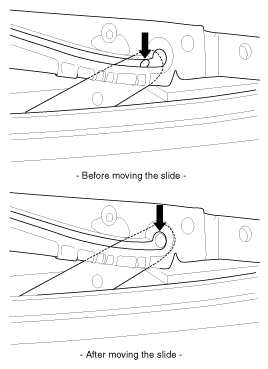
| 3. |
Release the sunroof CLOSE button with in 3 seconds. And then press
and hold the CLOSE button once again within 3 seconds until the sunroof
do as follows;
|
| 4. |
Then release the lever.
|
| 5. |
When the sunroof is closed completely, turn OFF the UP switch
initialize the motor completely.
|
When To Initialize The Motor
| 1. |
After initial vehicle assembly.
|
| 2. |
If the initial value is erased or damaged because of short power
electric discharge during operation.
|
| 3. |
After using the manual handle.
|
Operating The Sunroof Emergency Handle
| 1. |
Use the sunroof emergency handle to close or open the sunroof
manually if the sunroof cannot be closed electronically due to motor
or controller electrical malfunction.
|
| 2. |
Operating method.
|

 Sunroof Replacement
Glass Replacement
ŌĆó
Put on glove to protect your hands.
...
 Mirror Replacement
Outside Rear View Mirror Replacement
ŌĆó
When prying with a flat-tip screwdriver, wrap it w ...
See also:
Smart key unit Installation
Smart Key Unit
1.
Install the smart key unit.
2.
Install the smart key unit mounting nuts and connector.
3.
...
Overdrive Clutch Control Solenoid Valve(OD/C_VFS) Description
Overdrive clutch control solenoid valve(OD/C_VFS) is attached to the valve
body. This variable force solenoid valve directly controls the hydraulic pressure
inside the overdrive clutch.
...
Ignition Coil: Inspection
1.
Measure the primary coil resistance between terminals (+) and
(-).
Standard value:
0.75Ω ┬▒ 15%
...
Categories
- Kia Rio Manuals Home
- Kia Rio YB 2017-2026 Owners Manual
- Kia Rio YB 2017-2026 Service Manual
- Kia Rio UB 2012-2017 Owners Manual
- Kia Rio UB 2012-2017 Service Manual
- Downloads

Copyright ® www.kirmanual.com 2014-2026